Showing posts with label tunic. Show all posts

Friday, November 14, 2014

A Copy of Two Copies

Say what?! A copy of two copies? It's simpler than it sounds. Both Gayle and Shams copied a ready-to-wear tunic. I saw their versions, fell in love with the design, and copied them. And here's my copy:


This is made with three fabrics from Marcy Tilton - red rayon jersey, black and white dotted jersey, and printed mesh knit. They were great to work with, and the top went together fairly easily. The only changes I made to the design were to angle the hem and add a cowl neckline rather than a funnel neckline. I used my tried and true t-shirt pattern as the basis for the draft, and made changes for the details.

The cowl is simply a tube, applied to the neckline as you would apply a neck band. It is single layer, and I left the edge raw:


I've just realized my photos don't show the drawstring detail very well. Here's a close-up:


This is definitely my favorite detail in the garment, and it could translate easily to many different tunic and top designs. It was very straightforward to make, so I'll try to detail the process here.

First, I added an extra 5/8" to the seam allowance in the area that would become the drawstring channels. That gave me a 1-1/4" seam allowance, enough to make a 5/8" channel. Before sewing the seam, I pressed the hem allowances up. (This step is critical. There is no way to turn up the hem once the channels are sewn, so it must be done now.)

Next I made two drawstrings, sewing one end closed on each one. Then I got out some trusty Steam a Seam and applied it to the long edge of both casings. I laid the drawstrings inside the casings, leaving the raw edges extending out of the tops of the channels. I then pressed the Steam a Seam edges so they would hold it all together.


Off to the sewing machine, where I attached my topstitching foot. Starting at the seamline, I stitched across the top and down the side of each channel. That secured the drawstrings at the top, and enclosed them in the channels.


And that's all there was to it. Keeping the drawstrings out of the way while sewing the channels was the most difficult part. I suppose the channels could be stitched, then the drawstrings threaded through, and the top of the channels sewn shut. But this accomplished it all without having to do the threading.

Attaching the flounce was also very easy. It is simply a large rectangle of fabric. I cut away the lower front at an angle - easy to see in the top photo above. The side seam is sewn, ending at the top of the angle. Then the long edge of the rectangle is sewn to the angled side seam allowance, breaking the stitching where the "normal" side seam ends.

Yes, I am *this* happy when wearing this tunic. It is super comfortable, and I love the whimsy added by the details. Thanks to both Gayle and Shams for inspiring me to make this. I'll definitely be sewing it again. I'm thinking a solid color next time, maybe with a funnel collar...

Thursday, May 29, 2014

What I Sewed - And Didn't Sew - Over Memorial Day Weekend

I had four days to sew last weekend, so I gave myself a design challenge. I wanted to make something really unique, using the Nuevo Shirt pattern I've been working with this spring. I wasn't going to use any of the design elements given in the pattern - the collar, pocket, inset, etc. - and I thought I had all the fabrics lined up. This print was to be my key fabric:


It's a remnant of a crinkled blend of shirting, from Sawyer Brook. I love the colors, and it paired well with a solid black linen and a tiny black and white plaid shirting that looks gray from a distance. I had everything planned out, but something about this fabric kept gnawing at me. Then I realized what it was. The words. They're noisy. They're bold. They're anxiety producing. RUSH. URGENT. OVERNIGHT. These are not words a laid-back introvert wants to put on her body. Ever. The piece of fabric went into the red remnant box. (Yes, I keep my remnants sorted by color. It's the only way I can keep track of what I have on hand! And it's just about the only organized thing in my studio, for sure.)

So, I switched gears, and took another look through my boxes of remnants. Mind you, I had purchased black linen from Sawyer Brook and had the main shirt pieces cut out, so I wanted to continue with my plan. This time I chose this printed linen:


It, too, is bold and loud. But in an arty sort of way, one that I could live with easily. This is a huge print - the strings of green triangles are 6 to 8 inches or so long. I found a textured solid in the neon green color, and was on my way to make this awesome creation. I thought the giant print would give me great options for placement and topstitching on the solid black and all, but in the end it just befuddled me. The printed fabric is now laid out where I can look at it often, so I can figure out how to make this fabulous shirt. I'm not going to force it, because I know the key to making it work will come in time. Tomorrow I'm going to pin the fabric up on my design board so it's even more in my face. There's no giving in on this one!

*****
So, you ask, what did I make over the long weekend? Not something unusual at all, but a very sedate, follow-the-pattern, solid color tunic.


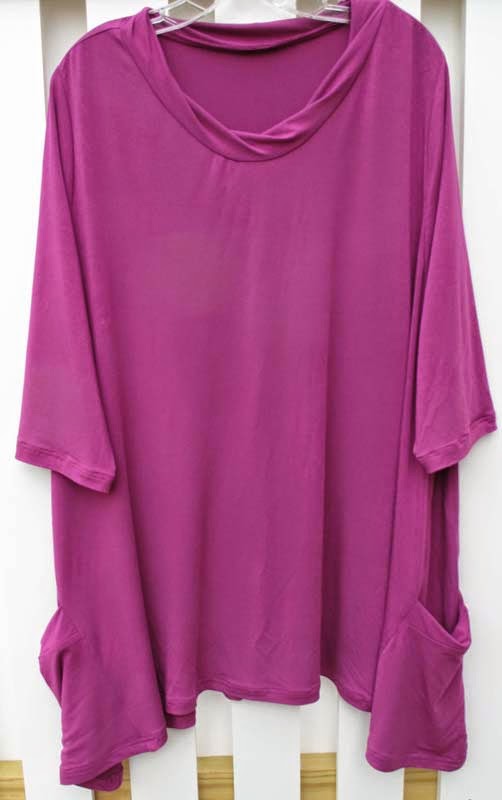
This is Katherine Tilton's Butterick 5925, made from a bamboo jersey from Marcy Tilton (gotta keep it in the family, ya know). I like the details on this top, specifically the cool lower side pockets and the twisted neckband.


The band on the pocket uses the same technique as the neckband for making it look as though the fabric is twisted. In reality, the long edges are simply offset by a couple of inches. In other words, when folding the neckband and matching the markings, the markings are about two inches from where they normally are. It's simple to do and the look is quite chic.


I shortened the sleeves to 3/4 length. After wearing the tunic today, I wish I had made them an inch or two longer. The only other change I made was to cut the armscyes and sleeve heads a size smaller than the rest of the pattern. I'm really pleased with the fit, and it's a really comfortable top to wear. 


I'm not giving up on that arty Nuevo shirt, so keep watch here because it will be showing up eventually!


Monday, November 28, 2011

Alice + Olivia Cowl Top

I've been doing more sewing than blogging these days, for sure.  I have three completed garments that I haven't yet written about.  Obtaining good photos of me wearing my garments is a challenge.  DH does his best, but doesn't have a critical eye for seeing things that are out of place, nor does he know how to pose me for the best shots.  Oh, how I wish I lived near my professional photographer sister!  Posing for her is a delight, and her photos are the best ever!  Since we live far apart, DH's photos are good enough.


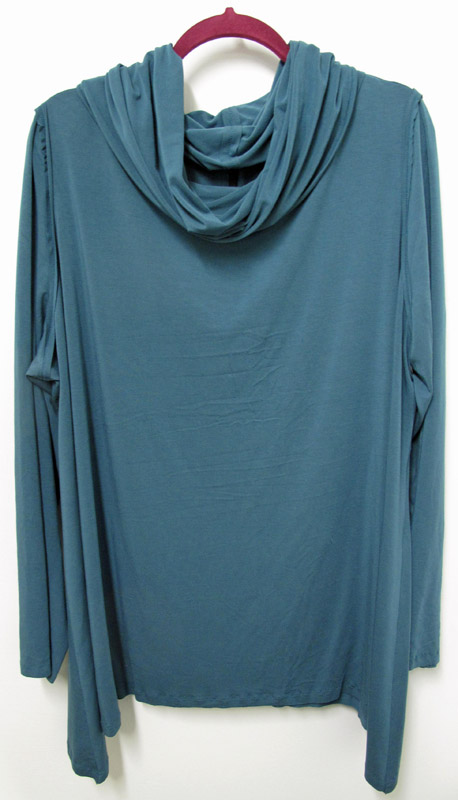
The tunic styles offered by Vogue 1261 appealed to me the moment I first set eyes upon them.  I love an uneven hemline and unusual construction techniques that result in a trendy, edgy garment.  In those aspects, this pattern is loaded.  The loose fit looked promising for my plus size figure.  I made the cowl neck version, and am very happy with the result.

The fabric is a luscious rayon jersey from Marcy Tilton.  It has good two-way stretch, which is required in this version.  The jersey doesn't curl, which was a big help in the cutting and construction processes, and necessary for smooth raw edges.  The armscyes are cut quite close to the underarm, and there are no darts, so the dual direction stretch probably helps with the fit in that area.  There are small folds under the arms, but I really didn't want to add darts, as there are so many other details in the design.  I cut the largest size, and added about an inch to the underarm seams.  I'm quite happy with the fit, although it's just a bit too wide across the chest.  If/when I make it again, I'll probably subtract a little wudth through the chest, to help draw in the fit an inch or so.

The primary design details are seams sewn wrong sides together and twin needle stitched from the wrong side.  I noticed on Pattern Review that several reviewers chose not to construct it this way, but I stuck with it and really like the look. 

I did change how the center back seam is sewn.  The instructions have you press the seams to the outside, butt the seams together, tape paper to them to stabilize the seam, and sew it with a twin needle from the inside of the garment.  This didn't really sound too stable, and seemed a bit risky, so I sewed the seam with wrong sides together, reinforced it with Design Plus fusible stabilizing tape (a great product!) and a layer of Totally Stable (another great product!) to give it stability and give enough bulk for the twin needle stitching to look good.  Since the seam was covered by interfacing and stabilizer, I drew a pencil line to guide me as I stitched.  A lot of effort, but I think it was successful.

 
I toyed with just using a zig-zag stitch on the outside, but found it was flat and I rather liked the dimensionality added by the twin needle stitching.  Removing the stabilizer was a long, tedious task that I performed in front of the TV.  It took much care, as pulling hard on it distorted the stitches.  Tweezers were an essential tool for this job!  Several layers of Solvy might have been a better product choice.

Viola, the finished seam, outside and inside:


The pattern calls for narrow ribbon to be sewn over the seam allowances, allowing the stitching to show in between.  I think that would be a great look but I knew I wouldn't find ribbon to match this fabric, so I simply trimmed the seam allowances to 3/8", and left them at that.

The reverse twin needle stitching is used on the center back collar seam, collar edge binding, and sleeve head seams.  I skipped the Totally Stable on these seams, and the stitches formed nicely.  Yards of fusible bias tape later, I finished the task.


The sleeve seams are a bit ragged because of the extra fabric resulting from easing the sleeve cap, but that just ups the funk factor.


 I love the drape of this collar.  It falls low enough that I can wear a short necklace, and it adds a bit of warmth without the close fit of a turtleneck.  Since the fabric is quite stretchy, I stabilized the neck edge with fusible tape early on in the construction process.  That prevented it from getting pulled out of shape, which would have easily occurred.

The sleeve and bottoms hems are single needle stitched 5/8" from the edge and left raw.  This was a pleasureable way to finish the tunic, as the twin needle reversed seams had taken a lot of time.  If the seams were all sewn to the inside, this would be an easy pattern to fit and sew.  If constructed as directed, the difficulty is raised a notch or two.  I'm glad I stuck with the original design, as I like wearing things that are a bit unusual.   The tunic is easy to wear, the color is soothing, and I feel very comfortable in it.  It is the first piece of my winter 6-pac, and I plan to wear it often!