Showing posts with label handbag. Show all posts

Monday, January 21, 2013

Felted Spirals Tote

Studio time in late November and early December was spent on designing and sewing a tote for myself. I knew I wanted it to be durable, roomy, and arty. Here's  the result of my efforts:


Yes, I got to play with the needlefelting machine I purchased last July. It's made by Simplicity, and is functional but not particularly well designed. For the money ($140 on sale), it was worth buying. It is easy to use and I could spend hours playing with it. I'm not sure how much I'll use it, but it's good to have it available when the felting urge hits.

The base fabric is wool melton from Sawyer Brook. The roving I used for felting was hand dyed by a friend who has a small yarn dying business. I pulled roving from two colorways that had lots of orange in them. No orange here, though. That's the beauty of working with roving; you can pull it apart to leave out bits you might not want in a particular project. After laying down the roving, weaving it where the stripes met, and felting it over and over, I felted some yarns in spiral shapes, and sewed on a multicolored nylon tape yarn and short rows of beads.


I love the colors of roving, and how they blend from one shade to the next. It adds a lot of dimension and depth to the design. I'm not much for glitz, but I really like the glimmer the beads add. Not wanting to overdo the design, I went with a smaller arty element on the back of the bag.


The chartreuse color is less vibrant in real life. It coordinates with the silk faille lining. I love a light colored lining because it allows me to see my stuff. There's nothing worse than searching through a dark lined bag!


That's a divided double pocket for my glasses and phone, plus a zippered pocket for keys. I inserted a piece of stable cardboard in the bottom and held it in place with black nickel-colored feet. (Sorry no pic.)


For durability and protection, I encased the bottom of the bag in leather. This was leftover from a vest a coworker made for a client. Janee was gracious to give it to me, and it's been languishing in my stash for a couple of years. I was glad to have it, as it protects the bottom of the bag from getting dirty. I also used it for the handles. It's super soft, yet strong, and feels really nice in my hands. This was my first experience with leather, and it sewed very easily. I tried a leather needle but found a denim needle worked better. I had no trouble feeding it evenly through my sewing machine, probably because I used my Pfaff's built in walking foot.

I used an old out of print bag pattern as a starting point, but I redrafted nearly all of it. It looks quite different from the original pattern photo.

The top of the bag is closed with a zipper. I had a waterproof one on hand from JoAnn's, and it looks great. Not that I needed it to be waterproof. But the tape on the waterproof style is very satiny, and the slide moves very smoothly. It was the perfect finish for this bag that was very fun to make and gives me a smile when I carry it!


Monday, October 15, 2012

September, a Month of Bags


Photo by Lisa Walker

Some of you must wonder where I've been for the past month. I've been up to my ears in handbags! After years of considering it, I've decided to design a line of bags to sell. A pipe dream? Perhaps in the long run it will be. But in the short term, it's a success. Let me explain.

This flurry of bag sewing was determined by a potential meeting with a boutique owner in Bloomington, Indiana. My husband and I drove there in late September for a family gathering of sorts. Two of my sisters live there, and my brother drove my parents there from New York, for a week long stay. It's not often my entire family can spend time together, so it was a really special week. It turned out to be an artistic vacation of sorts, which I'll write about in another post.

Back to the boutique. It's called Relish, and the vibe is urban chic. They sell home goods, including furniture, art objects, women's clothing and shoes, jewelry, etc. One of my sisters is a good customer there, and knows the owner, Sharon, well. She contacted her ahead of our visit to see if she would meet with me about my new handbag venture. Sharon agreed, and we met at the store one rainy afternoon. She was a wealth of information as far as retailing my bags is concerned, and we quickly agreed that trunk shows would be a good way to start. I wasn't totally familiar with the nuts and bolts of trunk shows, but basically, the artist shows up with the goods, while the store owner invites her best customers and creates a party atmosphere. It's a low risk situation, where the shop owner can see how well a craft person's work will sell, without making an investment in the merchandise. The shop owner takes a small percentage of the sales, so the profit for the artist is typically far more than selling at wholesale prices.

Sharon liked my bags, suggested ideas for other designs, and offered to hold a trunk show in her store! I wasn't expecting that, so I was thrilled. It was such a positive affirmation of the work I've been doing for the past three months.

My goal for the winter is to design and make at least 50 bags to show in the spring. Sharon gave me some leads for boutiques in the greater Boston area, so I'll be pursuing that as well. Normally I wouldn't travel as far as Indiana, at least, not at the start. But this is a great opening opportunity, given that many of my sister's friends shop at Relish. It could be a fantastic party! Sharon recommended a boutique in Indianapolis, so I'll pursue that in hopes that I can do two shows in one trip.

Relish's vibe is very gray and muted, so I entered our meeting with a bit of a concern because of my love of using bright colors in my bags. Sharon was able to set color aside, and see the potential my bags have. I showed her the two I made in July and August, as well as these three:

This double bag is from Vogue 8590, by Marcy Tilton. I love the versatility this bag offers. It is two bags in one, and others could be switched in and out, creating infinite possibilities. I love the shape, and the hidden pocket beneath the front flap.

I also love the combination of fabrics I found from my stash and at Sawyer Brook.


The unique feature of the bags I'll design is painting. Sometimes the elements will be large, and sometimes small, such as the flourish on this flap. I often add paint to a solid lining, and to inner pockets. I added inner pockets to each of these bags, but they're difficult to see because the top opening of the bag is small.

I love this double bag idea, and plan to stretch it out into a clutch shape, so that I can use one for my wallet items. By adding slots for credit cards and cash, and a zippered pocket for change, it can be a small bag that I carry inside a tote bag. And I can make coordinating second clutches to carry with it when going out. Fun!

Photo by Lisa Walker
This design and the next are self-drafted. I wanted a small-ish bag that would hold essentials and be fun to carry to social events. The faux suede was a cinch to paint. I couldn't believe how easy it was to work with, and how well it took the paint.
Imagine my horror when, after many hours of designing and sewing, I mis-cut the slits for the magnetic snap! There was my bag, my first prototype, with 1/4 holes where they didn't belong. They were only a quarter of an inch off, but the snap itself wasn't large enough to cover the slits. Thankfully, I had just received a silk screen of my name (ordered from Marcy Tilton), and I was able to make a long label to cover the holes. This time, I put the snap in the right place!

The next bag is a slight variation on the same design. I refined the side panels a bit, and gave it double handles.
Photo by Lisa Walker
The colors of this bag were inspired by the lining fabric, a gorgeous rayon/poly jacquard from France. I fused a light interfacing to it, to give it stability.


While I was making this bag, I kept thinking of my sister's friend, Angela. She loves orange, and has an extensive handbag collection. I showed her the bag and a gathering, and the moment she set eyes on it, she claimed it as hers. I sold it to her on the spot, for a really good price. Another success!

So, why did this take a month? Because I'm not showing you the design that is still in the works, and two others that are near completion. And because of structure. I like a bag that has stiffness to it, so it doesn't stretch and bulge and whatnot when loaded. Craftex is the perfect product for stiffening the bag, but it can't be turned inside out easily. Consequently, sewing the linings into the bags has to be done by hand. Then, there's the edge stitching, which can be difficult to do through stiff fabric and interfacing layers. Much of my time has been spent just figuring out how to put the bags together. I expect that to continue with each design I make, but I hope it will all come more easily the deeper into it I get.

There's no telling where this venture will take me, but as long as I'm having fun doing it, that's ok with me. I'll be posting bags here as I make them, as well as garments I have in mind for myself. It's going to be a busy autumn and winter in the studio!

P.S. Who is Lisa Walker, and why did she take photos of my bags? She's my talented photographer sister. I wanted photos of Angela's bag before leaving it behind, so we did a photo shoot of bags.  Her work can be found at Lisa Walker Photography and on SmugMug.

Tuesday, August 21, 2012

The Bag to End All Bagmaking (So I Vowed)

Some time ago I promised to write about a handbag I made in July. I'm finally ready to do it. I'm not sure what it is about my procrastination in blogging. I do my best writing with a really clear head, which I don't always have. So I put it off. Going forward, I'm going to try to blog during the process of making things, so things are fresher and quicker in getting onto the page. But I'm usually sewing full-tilt when I'm making something, so my head won't be clear... I don't know what the answer is. Any recommendations or thoughts from you readers are welcome!

Anyway, here it is, The Bag to End All Bag Making:


I started out with the desire to make a sturdy canvas bag to schelp all of my stuff to work - normal handbag items plus lunch and a water bottle. The natural colored canvas I painted with a wash didn't thrill me, but the pieces of linen I had painted with silk screen images did. So I switched to black duck, and was going to make "windows" in it and stitch the linen pieces in behind. Ever try to make a clean, flat window in duck? Not a chance. That's when Marcy Tilton's Vogue 8173 popped out of my pattern cabinet.


(Yes, I own a retro Butterick cabinet, gifted from an acquaintance who purchased it from a store that went out of business decades ago. It holds my pattern stash and much, much more.) But I digress.

The pattern is out of print, and I purchased it years ago because it incorporated silk screening. In fact, it's one of the patterns that nudged me into learning to paint fabric. I had never made it, and I had all of these images painted onto colorful fabric, and I had some gray silk dupioni and gray silk organza, and steam a seam lite, and batting, and Craf-Tex, and hardware, so I dove into the project. And it consumed me. For days. Weeks. For, maybe, 60 to 80 hours. Waaaaay too much time. But it was only time, and I was having fun, so it was all good.

Why did it take so much time? Cutting was partly to blame. I was very careful to cut the dupioni on grain, so I didn't double layer it. The various interfacings were stiff and bulky, so I cut them in one layer. All together, from the outside to the lining, there are 9 layers.
Interfacings, Steam a Seam, batting, and stiff
paperboard to stabilize the bottom.
Also, I cut out all of the images painted on the linen. Scissors worked best, but it took a lot of time. Sewing took a long time, too, but I'm getting ahead of myself.

Materials for the exterior, and templates for
cutting the images into shapes.
The exterior of the bag is constructed in several layers. The first step is to paint the Steam a Seam Lite. In this photo, you'll notice dark coral rectangles toward the top of the bag. (Click on the photo for a larger image.)


These, along with dark gray squares across the center and dark teal rectangles along the bottom, were painted on the Steam a Seam. After they dried, I fused them to the two outer pieces of the bag. Peeling away the paper, I had a nice, tacky surface to lay the linen pieces and ribbon on. Then I fused the silk organza on top. The Steam a Seam melted into the dupioni, but also held the organza in place.

Quilting was the next step, and it took a long time. Probably 4 to 5 hours for each side. I used two colorways of variegated thread, outlining each piece and tying the ends on the back side of the fabric. This added a big Wow factor, bringing the linen pieces into focus behind the organza. 


I love how the many layers give so much depth. You can see the texture in the dupioni, the painting on the Steam a Seam, the linen pieces, the organza, and finally the stitching. The light batting gives the linen fragments some dimension.


I didn't have enough aqua/turquoise linen for the lining, so I used a stretch cotton satin from Sawyer Brook. I applied a non-stretch fusible interfacing to keep it from stretching, which worked very well.

Marcy included a zippered pocket in the pattern. I made it slightly deeper, and changed the technique a bit. She used the top zipper tape as the top edge of the pocket. I chose to cut a strip of fabric for the top instead. I love the contrast of the zipper with the gray dupioni.


I wanted more pockets, so I created a double pocket that is tucked to make pouch shapes. I couldn't resist using a painted linen remnant for the lining.


I love trimming interior pockets with ribbon. It adds a little detail that makes me smile when I see it.


These pockets are perfect for my glasses case and phone. I added a magnetic snap at the center above the pockets, to hold the bag closed.


I thought the shirred handles shown in the pattern photo looked dated, so I made stiff ones. I cut them a few inches shorter, as I don't carry bags on my shoulders. The handles are made with the technique I described in my previous post. I love how rigid the Craf-Tex makes them. They don't crumble in my hand!

Before assembling the outer bag, I cut pieces of heavy Craf-Tex the size of the sides of the bag. The corner edges of the bag are edgestitched, which holds the Craf-Tex in place. Craf-Tex is a very stiff product that gives the bag the rigidness and stability I like. I didn't use it on the ends, because I wanted them to fold in.


Applying the binding was the point at which this became The Bag to End All Bag Making. I vowed to never make another handbag again, ever. I recall begging the Universe to save me from myself. Sewing through all of the layers and getting the binding even were very demanding tasks, and tried my patience. it was quite crazy making!


In hindsight, I should have used the lite Craf-Tex, as the heavy was very difficult to stitch through, especially with 8 other layers involved. It was a real struggle for my machine, and I had to hand stitch the ring tabs in place on the inside, as my Pfaff just couldn't handle it.


Surprise, surprise - the Universe did not save me from myself. (Does it ever?) Two weeks later, I made another bag. With Craf-Tex only in the handles. And lots of paint, lots of color, and lots of play. It was a blast. So was this one, actually. I really enjoyed the process, enjoyed seeing what the bag became as I worked on it. And now I enjoy carrying it. It's not a canvas tote, but my handbag necessities fit inside, and I can even squeeze a sandwich into it!


Wednesday, August 15, 2012

French Holiday Bag


I promised to write about the bag I made in July, but first I want to tell you about the bag I made in the past week. As soon as I finished The Bag To End All Bagmaking, sneak peeked in my previous post, I learned about a handbag contest on Pattern Review. The bag had to be made between August 1 and 15. At first I didn't think I had the reserves to make another bag right away, but with the encouragement of others and two weeks of trying to figure out what to make, I started on this:


I've had Marcy Tilton's Vogue 8590 in my pattern stash for several years. It was actually the impetus that led me to collecting silk screens and learning how to use them. I've been gathering silk dupioni pieces as I see them when fabric shopping. When I realized this gorgeous rayon batik from Sawyer Brook coordinated nicely with several of the silks, I chose it as a lining fabric and dove into the project.

First up was to cut my fabric pieces down to size to prepare for painting them. I prefer to paint before cutting pattern pieces out, as it's easier to handle larger pieces of fabric. My bag is made from 8 fabrics (the pattern calls for 9, including lining). Marcy made the cutting process much easier by grouping pattern pieces according to which fabric they're to be cut from. Here is a sample panel:

The pieces are drafted on the same grain line, so you can simply lay the panel over the fabric and cut the pieces out. This is what I did, with the exception of two fabrics that were small and required the pieces to be placed closer together in different arrangements. To make placing the painted images easier, I drew an outline of each piece on the dupioni using a disappearing chalk. Here is one of the painted panels, before the pieces were cut out:

When selecting which silk screen images to use, I considered the lining fabric. It spoke to me of fields of sunflowers and blazing bonfires at sunset. The sunflowers led me to Provence, and the French Holiday Bag was given its name. I used images culled from French culture - a fleur-de-lis, the Eiffel Tower, a letter written in French, a labyrinth from Chartres - as well as natural elements such as a singing bird, a nautilus shell, honeycomb, a bee, and a hydrangea.

Painting these pieces was lots of fun. It was challenging to keep in my head which colors of fabric would be adjacent to one another in the finished bag, so I could choose paint colors accordingly. I used 7 colors of Lumiere that echo the colors in the fabrics. 

Construction of the bag went smoothly, with one exception. The interfacing was a Goldilocks affair. The first was too stiff, the second was too limp, but the third was just right. 
I started by fusing Acro, a very stiff tailoring interfacing, to all of the outer pieces. After sewing the sides of the bag together, I realized there was no way it was going to gather well when the elastic was inserted into the front and back. it was just. too. darn. stiff. Out came the seam ripper and the seams, and I peeled off all of the interfacing. 
My next choice was Armo Weft, a weft-insertion interfacing that gives soft stability. After fusing it, I knew this would gather nicely, so I moved forward and sewed the outer shell of the bag. And it had very little body. 
Sooooo, I added a layer of Form-Flex, a woven fusible that had just the right amount of oomph. 

The left side with Form-Flex. Nice and stiff, as opposed to the opposite side! It fused nicely over the sides of the bag, even though the seams had been sewn. After fusing, I stitched the Form-Flex to the seam allowances, to keep it in place. Not the proper method of applying interfacing, but no way was I ripping the seams out again.
It stands up! Much better.

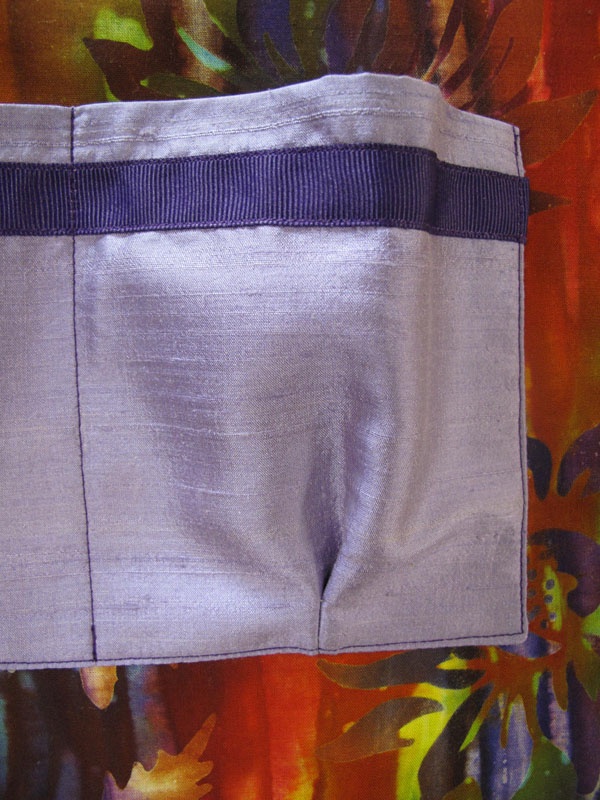
The bag has four pockets - one on each outside end, a zippered one inside, and an open double pocket inside. I used the zippered one as drafted, but cut the other one longer, and made two small tucks at the bottom edge. 

This forms a pouch, which makes it easier to slip in a glasses case or cell phone. I like to add small details to my bags, so I stitched on some grosgrain ribbon. 

The grosgrain is also on the inside of the outer pockets, where it will never be seen (but it will make me smile when I remember it!)

The zippered pocket uses a welt method for inserting the zipper. It makes a nice, clean finish. I love all this color!

I wanted stiff, uncrushable handles, so I made some changes there. For each handle I cut two pieces of fabric and a 1" strip of Craf-Tex Lite, a stiff interfacing  product Marcy stocks. It's fusible, so I simply wrapped one piece of fabric around it and fused. 

I pressed the edges of the other strip of fabric an eighth of an inch narrower, sprayed it with adhesive, and finger pressed it to the other strip. I then edge stitched the handle with the narrower fabric facing up.

This process encases all of the raw edges without having to turn a tube of fabric, and the Craf-Tex makes it very durable.

To stabilize the bottom, Marcy recommends plastic canvas or cardboard. I prefer a really stiff bottom in my bags, and years ago I purchased a large piece of paperboard. It works great for this purpose. I add a layer of needlepunch so there's no "CLUNK" when I drop things into my bag.

I added feet to the bottom of the bag, which is why you see a hole drilled in the paperboard.

I ran into some difficulty when trying to pull the elastic through the casings on the front and back. My bodkin slipped off the elastic several times. I finally got it through. Instead of stitching in the ditch with the machine, I did it by hand. There's a ditch on the facing side, too, so the stitching needed to hide in both ditches.

Marcy used narrow ties to close the bag, which gave a nice finishing touch. I knew I wouldn't want to have to tie it shut, so I inserted a small magnetic snap in the center front and back facings.

The snap makes the bag a bit plainer, but with all of the images, color, and that fabulous lining, I think it looks just great! It won't be an everyday bag, but I can hardly wait to carry it to a museum, out to dinner, or on a shopping trip. Who knows? Maybe some day I'll get to carry it in Provence!


Sunday, July 29, 2012

My 13th Month Blogiversary!

I must have been knee deep in sewing on June 29, the first anniversary of my first post on this blog. I discovered a few days later I had missed the date. So I'm celebrating a month later!

It's hard to believe a year (and more) has passed since beginning this adventure. I've had lots of fun sewing, knitting, painting, and writing about it, but the best reward has been all of the wonderful people I've met here. You readers have lifted me up and boosted my spirits time and time again. Your blogs have inspired me. So on this blogiversary, I celebrate each of you! Thank you for keeping me company here!

*************
Since I haven't posted in a while, you may wonder what have I been up to this month. For starters, I made a wearable muslin of a tank top pattern today. It's too wide through the neckline and shoulders, and I cut the vee neck too low, so it's going to be loungewear for home. I'll probably make some adjustments and try it again, as it fits well in the lower part. It's darted, which makes for a terrific fit through the bust.

I've been doing a lot of knitting this month, partly as a means of staying cool in the heat. Sounds like any oxymoron, I know. Our home is air conditioned, but my husband thinks 78 is comfortable. My overweight, postmenopausal body thinks otherwise! Our den is on our basement level, and it's cooler down there. There's a large window and a sliding door, so I don't feel hemmed in. The TV and stereo are down there, so it's the perfect place to knit.

First I started a drapey cardigan for myself, in a gorgeous cherry red textural cotton ribbon yarn. A couple of weeks into that, I got the itch to knit a throw for  my sister. I've been at that for about two weeks now. I'm on my third version, as I wasn't pleased with how the first two looked. Here's a sneak peak:

A market bag is also in the works. I save it for knitting group nights, as it's easy to knit with conversation going on. Then there are the socks and necklace, set aside some time ago and waiting to be finished. Can you tell I like to jump around a bit on knitting projects?!

My largest and most time consuming project this month is a handbag. It was a project to end all projects, involving paint, quilting, and eight layers of fabric and interfacing. I'll be writing about it soon. Until then, here's a sneak peak:

*************

Thanks for stopping by and helping me celebrate a fun, fun year of blogging!