Showing posts with label ReVisions. Show all posts

Tuesday, July 1, 2014

Turtle Batik Shirt


Catching up on blogging about garments here, this shirt was made in late April. I've been waiting for a modeled photo, which just hasn't happened, for one reason (bad hair day) or another (husband's schedule not meshing with mine). So I'll forge ahead with this post anyway, as the shirt is but a fading memory in my sewing mind.

For this artistic expression, I chose the Nuevo shirt pattern from Revisions (again), a rayon batik from my collection, a solid royal linen from Marcy Tilton, and Diane Ericson's turtle stencil. 

Printing with the stencil was lots of fun. I added it to the back yoke and a re-shaped pocket, after cutting the pieces out but before sewing them. This is my favorite method of printing, as I can easily determine where the printed image will fall on my body when wearing the garment. 


After sewing, I added some hand sewn backstitching in embroidery floss. I like how this added some definition to the pieces. 


Some really great buttons from Sawyer Brook were a perfect match. They're carved and dyed coconut shell disks.


I've decided this is my take on the proverbial Hawaiian shirt. I'd never wear one right off the rack, but I'm a bit more comfortable in this version. It's not something I'd wear everywhere, but it's perfect for a barbeque, picnic, or casual night out at a seafood shack. Here's a shot of my husband and me at a function during our week in Hawaii:


P.S. Eric never drinks sweet drinks, so he must have chosen that green concoction because it matched my shirt!

*******
I just celebrated my third blogiversary! I haven't been as prolific or regular a blogger as I had initially envisioned, but I love having this place to share my creations. Thanks to all who visit here, especially those who have supported me with your comments!


Thursday, May 29, 2014

What I Sewed - And Didn't Sew - Over Memorial Day Weekend

I had four days to sew last weekend, so I gave myself a design challenge. I wanted to make something really unique, using the Nuevo Shirt pattern I've been working with this spring. I wasn't going to use any of the design elements given in the pattern - the collar, pocket, inset, etc. - and I thought I had all the fabrics lined up. This print was to be my key fabric:


It's a remnant of a crinkled blend of shirting, from Sawyer Brook. I love the colors, and it paired well with a solid black linen and a tiny black and white plaid shirting that looks gray from a distance. I had everything planned out, but something about this fabric kept gnawing at me. Then I realized what it was. The words. They're noisy. They're bold. They're anxiety producing. RUSH. URGENT. OVERNIGHT. These are not words a laid-back introvert wants to put on her body. Ever. The piece of fabric went into the red remnant box. (Yes, I keep my remnants sorted by color. It's the only way I can keep track of what I have on hand! And it's just about the only organized thing in my studio, for sure.)

So, I switched gears, and took another look through my boxes of remnants. Mind you, I had purchased black linen from Sawyer Brook and had the main shirt pieces cut out, so I wanted to continue with my plan. This time I chose this printed linen:


It, too, is bold and loud. But in an arty sort of way, one that I could live with easily. This is a huge print - the strings of green triangles are 6 to 8 inches or so long. I found a textured solid in the neon green color, and was on my way to make this awesome creation. I thought the giant print would give me great options for placement and topstitching on the solid black and all, but in the end it just befuddled me. The printed fabric is now laid out where I can look at it often, so I can figure out how to make this fabulous shirt. I'm not going to force it, because I know the key to making it work will come in time. Tomorrow I'm going to pin the fabric up on my design board so it's even more in my face. There's no giving in on this one!

*****
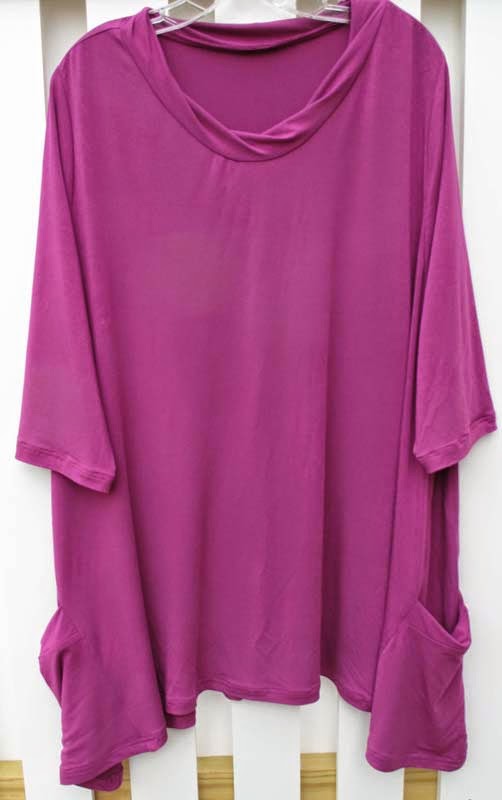
So, you ask, what did I make over the long weekend? Not something unusual at all, but a very sedate, follow-the-pattern, solid color tunic.


This is Katherine Tilton's Butterick 5925, made from a bamboo jersey from Marcy Tilton (gotta keep it in the family, ya know). I like the details on this top, specifically the cool lower side pockets and the twisted neckband.


The band on the pocket uses the same technique as the neckband for making it look as though the fabric is twisted. In reality, the long edges are simply offset by a couple of inches. In other words, when folding the neckband and matching the markings, the markings are about two inches from where they normally are. It's simple to do and the look is quite chic.


I shortened the sleeves to 3/4 length. After wearing the tunic today, I wish I had made them an inch or two longer. The only other change I made was to cut the armscyes and sleeve heads a size smaller than the rest of the pattern. I'm really pleased with the fit, and it's a really comfortable top to wear. 


I'm not giving up on that arty Nuevo shirt, so keep watch here because it will be showing up eventually!


Tuesday, May 27, 2014

An Unlikely Favorite


One of the best things about working at Sawyer Brook is easy access to small fabric remnants. The floral print I used in this shirt was just such a remnant. Small enough that I used nearly all of it. I combined it with a white linen and a cotton stripe. The print and stripe had caught my eye while both were still on rolls, but I didn't buy them then as I thought I'd never wear a garment using the two of them. Too busy. The addition of the white convinced me to go ahead with what is now one of my favorite shirts.

The pattern I used is ReVisions' Nuevo Shirt, one of my favorites from Diane Ericson. I love the design ideas Diane included in the pattern, as well as the cool pocket inset, the two piece sleeves and the bias-cut asymmetrical collar that lays beautifully.

The pattern has long sleeves with a really cool cuff treatment. I chose to cut them short for summer wear, and inserted bias strips into the seam.


I modified the top edge of the pocket and added free motion topstitching. I really love this pocket treatment, as it's such a good opportunity for combining fabrics. It becomes the focal point of the shirt.


If you enlarge the photo above, you'll see the triangular buttons from Sawyer Brook. I've wanted to use these buttons since they first arrived at the store, and they are a perfect match to the greens in the fabrics.

I recently made another Nuevo shirt, and have yet a third in the works. Keep watch for them here!


Friday, March 1, 2013

Black and Plum = Yum

Finally, a photo opportunity - when husband was available and light was bright. I modeled this top and vest, made in December and January:


Let's begin with the top. Both fabrics are from Marcy Tilton, and have been  marinating in my collection for a while. They were separate purchases, but when I saw them together I knew they would be perfect in one garment.


I love the idea of combining mesh and opaque fabrics, but as a plus size gal, there's little of my body I want to expose through mesh. I pondered the challenge for a while and came up with the idea of a cowl and scrunchy cuffs.


I love the sheerness and gathers of the mesh against the tiny polka dotted rayon. The mesh is very light and easily collapses into a frothy ring around my neck. Fun!

I used a TNT pattern for this, and simply cut the cowl to fit the neck opening. It is quite high; if I pull it up it entirely covers my head. The mesh and jersey were a really easy sew, and the top is a delight to wear. (Of course it is. It's purple!)

The vest was made using an out of print pattern from Diane Ericson:

The teatowel vest is certainly outdated now (was it ever exactly fashionable?) but I think I can get a lot of mileage out of the other two designs. I used view A.

I started with a gorgeous wool crepe from Sawyer Brook. Wanting to take advantage of several textural black fabrics in my remnant collection, I decided to design pieced lapels. The pattern includes only a long, straight lapel piece. Here is the pattern mock up as I designed it:

And here are the lapels I spent hours designing, cutting out and sewing together, only to decide I didn't like the look:

If you click on the photo to enlarge it, you'll be able to see the textures a bit better. The reason I nixed these lapels is they were just too much. I didn't like the choppiness of the edges, even though I had staggered them. In a nutshell, it just seemed too crafty. So, I backed off and went for the streamlined look of the original pattern piece, and chose one of the textured fabrics. 


The vest has a fun construction detail. Except for the shoulder seams, all seams are overlapped and topstitched. To do this, the entire vest is lined to the edge and turned inside out. Then the back pieces are overlapped and stitched, and the sides follow suit. This means lots of pin fitting, and making sure of where the seam lines will be before attaching the lining. The overlapping leaves little vents at the lower back and side seams.


I like the asymmetrical back and the button detail. The seam gives a nice vertical element to the back, too. Always a benefit for a plus size!

The hemline is angled from high in the front to low in the back. My full midriff tends to pull hems up in front, so I added about an inch in length to the center front. I love how this vest falls over my curves. Both the ambiance rayon lining (which feels scrumptious!) and lines of the pattern allow for this.


The vest is a valuable addition to my winter wardrobe, as it layers easily over almost any top I've made. It's the perfect layer for keeping a touch warmer when the temperatures are cold. It can also be dressed up or down, depending on the occasion. I'm loving it!

Sunday, October 9, 2011

Nuevo Yukata Shirt


A few years ago at a sewing expo, I purchased several vintage Japanese fabric pieces from June Colburn.  These were salesman's samples of traditional blue and white printed cottons for yukata, the casual summer kimono.  The pieces are quite small - about 18" in width, and 24"' or so in length.  For this shirt, I chose two fabrics to pair with white linen from Sawyer Brook.  When I started working on this project back in August, I took some photos of the fabrics together, before I cut them up.  I'm sure they were stunning photos, but we'll never know, because the computer gnomes stole ran off with them.  (Seems they wanted to ditch their frumpy gnomewear for some stylish yukata.)  So, you'll have to use your imagination to envision the small amount of fabric I had to work with.  By the time the garment was finished, I had used almost every square inch of it.

I merged two patterns to create this shirt.  The base pattern is an out-of-print Vogue by Sandra Betzina (sorry, I can't find the number online and my copy is at my studio).  It's a classic shirt style, with a traditional front placket, shirt collar and cuffs.  I'm finding her patterns fit me fairly well, and are a good starting point from which I can arrive at a garment that fits me well.  I made a few basic alterations to tweak the fit.

The design elements in this shirt are from ReVisions Nuevo Shirt pattern.  I'm drawn to Diane Ericson's design aesthetic, and the features of this shirt pattern have long interested me.  It's arty without being wacky or looking like a craft project. 

Diane's shirt has a very loose fit, with dropped shoulders.  That style is not becoming to me, which is why I used the Vogue pattern for the basic shape.  I eliminated the front placket from the Vogue pattern, as well as the collar.  I don't care for a close-fitting neckline, so I lowered the front by about an inch.  I drafted the mandarin collar - a favorite collar style for me, as my neck is short.  I duplicated the shirt tail hemline of the Nuevo shirt.

One of the design features of the Nuevo shirt is the inset and pocket on the right front.  This is the perfect showcase for the yukata fabrics.  One - the pocket fabric - is printed on both sides, giving me three prints to combine.

Construction of this element is not complicated, but a good result depends on very careful seaming.  Interfacing is fused to the shirt, then the center of the "box" is cut out, and the inset is sewn in one edge at a time.  Getting sharp, square corners can be a bit tricky.  I edgestitched both the pocket and the inset.

This inset is the perfect opportunity for surface embellishment, which I'd like to do on a future shirt.  There is also a back yoke which can be embellished, but I eliminated it this time around because my print fabrics were in such limited supply.  Instead, I inserted a strip of yukata fabric down the center back. 

This visually breaks up a large expanse of white on the back of the shirt, and ties the back to the front, design-wise.

The Nuevo shirt sleeve is seamed down the center, as well as at the underarm.  I split the Vogue sleeve pattern in two, and drafted Diane's sleeve design at the bottom.  I really like the Nuevo "half cuff" feature.  It gives opportunity to add more of the printed fabric, to balance the design features.  I love asymmetry, so using a different fabric on each cuff adds to my visual pleasure.


I was pleased with the white and blue look, but felt a need to add blue to other areas of the shirt, to pull it all together. I topstitched the shoulders, outer sleeve seams, front openings, and collar with blue topstitching thread.  It made a huge difference in the overall continuity of the garment.

I shopped around for buttons and didn't have success until I found some at my local yarn shop.  The blue color was very hard to match, and these blue and white ones are just perfect.  (I'll try to get a close up photo next time I'm shooting photos.)  There were only 6 available, and I bought all of them.  I regret not using all 6, as the shirt gapes a bit when I wear it.  I'm not sure how to resolve this situation, since the buttonholes are cut.  I could add a placket, covering the existing holes, but I don't think I'd like a placket with the styling of this shirt. 

Plus, that would be a lot of work, and I'm pretty much done with this shirt, energy wise. Between searching for buttons and taking in the side seams a couple of times, the shirt was hanging around my studio way too long. I finally got the side seams right on Wednesday, and wore it to work Thursday. It will probably be put away until Spring, unless these Indian summer days continue. 

This was a really fun sewing project.  I'm still not sure I'm comfortable wearing shirts, as I prefer the drape of knit fabrics over the stiffness of wovens, but, who knows?  Maybe I'll get used to it!
The end.  :)