Showing posts with label Marcy Tilton. Show all posts

Friday, December 12, 2014

A Disappointing Vest, Vogue 9034

And now I've come to the bottom of the pile, the last of the garments I made during the summer and early autumn of this year. The bottom of the pile also means the last of the photos taken by my sister, Lisa, at the end of October. I'll miss these colorful portraits!

In September, I whipped up this vest and top:


Only after arriving home and editing these photos did I notice I didn't have the lapels of this vest turned back properly. So, I took some selfies to show how the lapels are supposed to lie.


This vest was made using Vogue 9034, a pattern I can't recommend as is. The reasons? Many shortcuts were taken with the pattern instructions and pieces. And it's not a Very Easy Vogue pattern. So, what gives, Vogue?

First of all, the garment is lined to the edges. Not a good construction practice. I much prefer facings and hems, to give the garment more structure. Secondly, no interfacing in the lapels!!! Horrors! I foolishly followed the instructions, and put interfacing only in the collar. Big mistake, as you can see in the photos. Those lapels are crying out for more support.


Thirdly, no tailoring techniques were recommended. To give Vogue credit, the undercollar is cut in two pieces, on the bias. A surprise, considering the lack of any other tailoring tricks. I did know enough to hand sew the undercollar/body seam to the collar/facing seam. But I really should have interfaced the front, faced and interfaced the armholes, and hemmed the bottom. I'm not sure why I blindly sewed along to the directions. I must have been in a trance of some sort!

The fabric is a rayon/linen blend from Marcy Tilton. It was a gem to work with, and I love the color. The jersey for the top is from her, also. I used my TNT t-shirt pattern, Vogue 8793.


I love the print of the top, and it was cool how these two fabrics came together, as they were purchased separately. Too bad I probably won't wear the vest very much. It just looks too sloppy. A shame. I suppose I could take it apart and remake it the right way, but I'm not sure how motivated I am to do that.


I do like the asymmetry of the front of the vest. I'm not crazy about the rest of it, though, so I just might reclaim the fabric for another pursuit. I have at least 1/2 yard of the fabric remaining, so it could become part of another garment.

All in all, a disappointing pattern and garment.

*****
Why in the world, you ask, am I standing next to a Hindu statue (a deity?), with my hand on its head? Because I couldn't resist her. The grounds of the manor where my sister lives is dotted with these, along with a few Japanese and Celtic statues. An eclectic mix, almost humorously positioned among the grasses and Indiana limestone rocks that dot the landscape. I had fun wandering the gardens and photographing the statuary. Enjoy!


Tuesday, July 1, 2014

Turtle Batik Shirt


Catching up on blogging about garments here, this shirt was made in late April. I've been waiting for a modeled photo, which just hasn't happened, for one reason (bad hair day) or another (husband's schedule not meshing with mine). So I'll forge ahead with this post anyway, as the shirt is but a fading memory in my sewing mind.

For this artistic expression, I chose the Nuevo shirt pattern from Revisions (again), a rayon batik from my collection, a solid royal linen from Marcy Tilton, and Diane Ericson's turtle stencil. 

Printing with the stencil was lots of fun. I added it to the back yoke and a re-shaped pocket, after cutting the pieces out but before sewing them. This is my favorite method of printing, as I can easily determine where the printed image will fall on my body when wearing the garment. 


After sewing, I added some hand sewn backstitching in embroidery floss. I like how this added some definition to the pieces. 


Some really great buttons from Sawyer Brook were a perfect match. They're carved and dyed coconut shell disks.


I've decided this is my take on the proverbial Hawaiian shirt. I'd never wear one right off the rack, but I'm a bit more comfortable in this version. It's not something I'd wear everywhere, but it's perfect for a barbeque, picnic, or casual night out at a seafood shack. Here's a shot of my husband and me at a function during our week in Hawaii:


P.S. Eric never drinks sweet drinks, so he must have chosen that green concoction because it matched my shirt!

*******
I just celebrated my third blogiversary! I haven't been as prolific or regular a blogger as I had initially envisioned, but I love having this place to share my creations. Thanks to all who visit here, especially those who have supported me with your comments!


Thursday, May 29, 2014

What I Sewed - And Didn't Sew - Over Memorial Day Weekend

I had four days to sew last weekend, so I gave myself a design challenge. I wanted to make something really unique, using the Nuevo Shirt pattern I've been working with this spring. I wasn't going to use any of the design elements given in the pattern - the collar, pocket, inset, etc. - and I thought I had all the fabrics lined up. This print was to be my key fabric:


It's a remnant of a crinkled blend of shirting, from Sawyer Brook. I love the colors, and it paired well with a solid black linen and a tiny black and white plaid shirting that looks gray from a distance. I had everything planned out, but something about this fabric kept gnawing at me. Then I realized what it was. The words. They're noisy. They're bold. They're anxiety producing. RUSH. URGENT. OVERNIGHT. These are not words a laid-back introvert wants to put on her body. Ever. The piece of fabric went into the red remnant box. (Yes, I keep my remnants sorted by color. It's the only way I can keep track of what I have on hand! And it's just about the only organized thing in my studio, for sure.)

So, I switched gears, and took another look through my boxes of remnants. Mind you, I had purchased black linen from Sawyer Brook and had the main shirt pieces cut out, so I wanted to continue with my plan. This time I chose this printed linen:


It, too, is bold and loud. But in an arty sort of way, one that I could live with easily. This is a huge print - the strings of green triangles are 6 to 8 inches or so long. I found a textured solid in the neon green color, and was on my way to make this awesome creation. I thought the giant print would give me great options for placement and topstitching on the solid black and all, but in the end it just befuddled me. The printed fabric is now laid out where I can look at it often, so I can figure out how to make this fabulous shirt. I'm not going to force it, because I know the key to making it work will come in time. Tomorrow I'm going to pin the fabric up on my design board so it's even more in my face. There's no giving in on this one!

*****
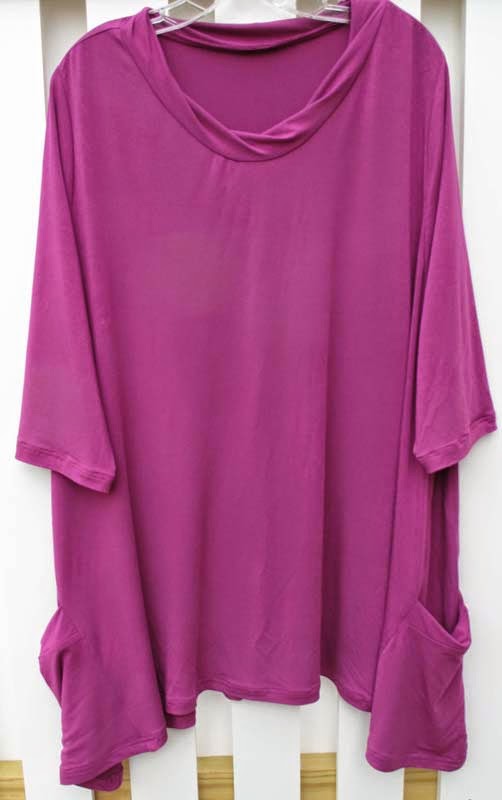
So, you ask, what did I make over the long weekend? Not something unusual at all, but a very sedate, follow-the-pattern, solid color tunic.


This is Katherine Tilton's Butterick 5925, made from a bamboo jersey from Marcy Tilton (gotta keep it in the family, ya know). I like the details on this top, specifically the cool lower side pockets and the twisted neckband.


The band on the pocket uses the same technique as the neckband for making it look as though the fabric is twisted. In reality, the long edges are simply offset by a couple of inches. In other words, when folding the neckband and matching the markings, the markings are about two inches from where they normally are. It's simple to do and the look is quite chic.


I shortened the sleeves to 3/4 length. After wearing the tunic today, I wish I had made them an inch or two longer. The only other change I made was to cut the armscyes and sleeve heads a size smaller than the rest of the pattern. I'm really pleased with the fit, and it's a really comfortable top to wear. 


I'm not giving up on that arty Nuevo shirt, so keep watch here because it will be showing up eventually!


Sunday, April 13, 2014

Whimsical Red Vest

I'm back! After about four months of little or no sewing, my desire to create in the studio is stronger than ever. Which feels sooooooo good! I've been playing in the studio nearly every day for over two weeks now, and I'm learning and creating and having a blast. I've been playing with stencils and paint, making some sample prints and some finished garments. Here is the first item I've made this spring:


As they say here in New England, that's wicked bright! It's a gorgeous linen from Marcy Tilton that's been in my collection for a couple of years now. The trim fabrics are remnants from Sawyer Brook. I used Diane Ericson's Revisions Java Jacket pattern. It was very easy to add a couple of inches at the sides and bottom to make it fit, and it's a very straightforward pattern to follow. The fussy part was the binding on the neck and armholes, but it wasn't difficult. Just painstaking to make sure things lined up just so.

The theme for the vest was determined by the buttons, which are fused glass, made by a wonderful woman who lives in Rhode Island. I see her every year at the regional sewing expo, and she had a trunk show at a local yarn shop this past winter. I've amassed quite an assortment of these buttons over the years, so it was a joy to finally use these red ones.

I love the geometry in these buttons, and how the melting process softens the edges a bit. They're still very angular, but there's a feminine quality to them as well.


No two buttons are alike, so they offer nice variety as design elements. 


I painted the black band and the bodice using stencils from Diane Ericson. The buttons determined the colors and influenced my choice of stencil images. I love the whimsical touch the stenciling adds to the garment!


The pattern offers two lower pocket options, but I decided not to use them, as I didn't want to draw attention to that part of the garment. I really wanted the focus to be at the top, with a strong vertical center element. Those are the lines that seem to flatter my body most.

I neglected to take a photo of the back. It is two overlapped pieces, with a long vent at the bottom. At the waist there's a blue shaped tab adorned with a button.

I'll have a few opportunities to wear this before the weather becomes too warm for it. Then it's into the closet for a few months. It's a great spring/autumn piece, and it will add lots of color to my look when I want it!


Next up: a tote bag I finished today, to take to Hawaii at the end of the month. Stay tuned, as I'll be writing again soon. Promise!

Friday, November 15, 2013

Where Have I Been? Or, What to Do When The Urge Vanishes

Seven months without blogging. What happened? A lot. Where have I been? Here. What have I been doing? Knitting like a fiend. Recently, sewing like a fiend. Let me explain.

In May my sewing mojo took a hike, went on vacation, was missing in action. Gone. A few feeble attempts at accomplishing something in the studio were in vain. I simply had no desire to sew. None whatsoever. So, I decided that aspect of my creative life needed a break. And I started knitting. I knit like crazy, and shawls appeared like bunny rabbits. Lots of shawls - eight completed so far this year, three more currently on needles. I couldn't get enough of them!

Stephen West's Barndom shawl, before blocking.
Knit with Breathless cashmere/merino/silk yarn.
My absolute favorite yarn and shawl of all time.
This knitting fever lasted all summer, into September. So did the sewing heebie jeebies. No sewing for four months. The entire summer my studio sat idle. And I knit shawls. And socks.

Entwined cabled socks. Knit in Hazel Knits Entice
(merino, cashmere, nylon sock yarn).
Letting the sewing landscape lie fallow was a good move. I firmly believe you can't force creativity. If the urge isn't there, there's no making it happen. Letting it rest lets other things come to the forefront. And it's not gone, it's just hibernating. It's lying quietly, brewing ideas, growing new roots and shoots, preparing to sprout.

And then one day the creative urge returns. For me it was mid-September. Subtle at first, it quickly gained momentum and I found myself in the middle of making a coat. I finished it mid-October, and started another, which I completed today. And now a jacket is under way. My sewing mojo has definitely returned, and the creative energy is flowing freely. It's a great feeling!

Meanwhile, knitting has taken a back seat. I still dabble in it, but I'm not knitting for hours every day like I was. My creative energy has shifted, and that's ok. I finally feel like blogging again - another creative pursuit that ebbs and flows. So here I am, and that's what happened over the past seven months.

*****

In an effort to catch up on blogging, I'm showing two bags I made in April and May. I have only one photo of the first, view B of Diane Ericson's Pacific Purse pattern.

The fabrics are silk duppioni, linen and quilting prints. The button has been in my stash for many years, and it was the inspiration for the bag. The flap and most of the back are stenciled using Diane Ericson's Spring Leaves stencil and Lumiere paints. To create the stripe effect, I used strips of sticky-back paper (like Post-It Notes) to mask part of the fabric. Then I did the stenciling, and carefully peeled the paper away. This could be done with masking tape, also. I added some hand embroidery to add some definition.

I really like this bag, but I never carry it as the greens are too yellow for my coloring. They just don't look great with my wardrobe. I don't want to give the bag away, either, because I like the button too much. For now it will stay as it is, but I suspect the button will some day be removed to be used on a jacket. In the meantime, it can enjoy living on this bag.

The second bag is one of my favorite painted creations. I used both stencils and silk screens to embellish this tote.


The basic shape was achieved using Butterick 5866. I added the pockets on the front and back, plus some in the interior. The fabrics are deep purple cotton shirting, lavender wool gauze, linen, and silk organza. I especially like the organza overlay that is crinkled and embellished with buttons.


That's a foiled damselfly at the top left. I used the foil on a couple of moths as well. The writing on the front is bleached using a dye resist through a silk screen. All of the screens used are from Marcy Tilton. The eucalyptus stencil is from Diane Ericson. It was really fun to combine purple and pewter paint in the stenciling.


The lining fabric is a textured linen/rayon blend, and I added my usual tucked slip pockets to the zippered pocket that came with the pattern.


Once completed, I realized I don't care for the drawstring closure on the top. There's no way I'm going to use a tote with a drawstring for everyday use. So this became my knitting bag, and it's carried many a shawl-in-progress over the past few months.


That wraps it up for this catch-up post. Thanks to those of you who checked in on me during my silence, and visited the blog despite there being no current postings. I love the feedback you readers give, and I missed the online sewing community I've found through this blog. I'm so glad to be back sewing and blogging!

Wednesday, April 24, 2013

Purple Stripes on the Double

Apologies to my regular readers for not blogging in so long. I seem to go through stretches where I'm just not inspired to post photos of myself online. Here's an attempt to get back into a routine.

Back in February I made two different garments using purple striped fabrics. The first is this knit top:


This fabric is a gorgeous purple and black striped double knit from Marcy Tilton. It has a beefy hand and was a dream to sew. I used Katherine Tilton's V8710 , which I've made a couple of times before. I raised the neckline and added a twisted, loose turtleneck to this one, making it perfect for winter wear.

Some non-plus size sewists have complained about the fullness of this top, but I really like it. There is a lot of extra fabric, however, so if that's not your ideal, I recommend slimming it down.


I enjoyed wearing this in the cold months, and will get a lot of use from it next fall and winter. It's really comfortable and cozy!

The second garment is this shirt, made from a tone-on-tone striped cotton shirting, also from Marcy.


The pattern is a hybrid based on an out of print Sandra Betzina shirt pattern, with details from Diane Ericson's Nuevo Shirt pattern (sorry, I can't get a link to the pattern itself), and her out of print Just Pockets pattern. I love, love the pocket, and the interesting cuffs:

The layers of the pocket are assembled and basted on top of the base piece, then the entire thing is inset into the shirt front (rather than laid on the shirt and topstitched). It's finicky, but I really like the look.

I was hoping to really like the shirt, but I have to say I don't, just because I don't like how woven fabrics drape on my body. There always seems to be too much extra fabric in a shirt, and I feel sloppy wearing one. Maybe it's because I haven't found a good fit in the chest and shoulder area. Or maybe that's just how a shirt fits. I don't know. What do you think?

By the way, those are rounded square tagua nut (a.k.a. corozo) buttons, from Sawyer Brook. They are a perfect color match and I love their angularity on this garment, as the design lines are angular too.

There are several more items in line for me to blog about, including a jacket and two bags, so stay tuned!

Friday, March 1, 2013

Black and Plum = Yum

Finally, a photo opportunity - when husband was available and light was bright. I modeled this top and vest, made in December and January:


Let's begin with the top. Both fabrics are from Marcy Tilton, and have been  marinating in my collection for a while. They were separate purchases, but when I saw them together I knew they would be perfect in one garment.


I love the idea of combining mesh and opaque fabrics, but as a plus size gal, there's little of my body I want to expose through mesh. I pondered the challenge for a while and came up with the idea of a cowl and scrunchy cuffs.


I love the sheerness and gathers of the mesh against the tiny polka dotted rayon. The mesh is very light and easily collapses into a frothy ring around my neck. Fun!

I used a TNT pattern for this, and simply cut the cowl to fit the neck opening. It is quite high; if I pull it up it entirely covers my head. The mesh and jersey were a really easy sew, and the top is a delight to wear. (Of course it is. It's purple!)

The vest was made using an out of print pattern from Diane Ericson:

The teatowel vest is certainly outdated now (was it ever exactly fashionable?) but I think I can get a lot of mileage out of the other two designs. I used view A.

I started with a gorgeous wool crepe from Sawyer Brook. Wanting to take advantage of several textural black fabrics in my remnant collection, I decided to design pieced lapels. The pattern includes only a long, straight lapel piece. Here is the pattern mock up as I designed it:

And here are the lapels I spent hours designing, cutting out and sewing together, only to decide I didn't like the look:

If you click on the photo to enlarge it, you'll be able to see the textures a bit better. The reason I nixed these lapels is they were just too much. I didn't like the choppiness of the edges, even though I had staggered them. In a nutshell, it just seemed too crafty. So, I backed off and went for the streamlined look of the original pattern piece, and chose one of the textured fabrics. 


The vest has a fun construction detail. Except for the shoulder seams, all seams are overlapped and topstitched. To do this, the entire vest is lined to the edge and turned inside out. Then the back pieces are overlapped and stitched, and the sides follow suit. This means lots of pin fitting, and making sure of where the seam lines will be before attaching the lining. The overlapping leaves little vents at the lower back and side seams.


I like the asymmetrical back and the button detail. The seam gives a nice vertical element to the back, too. Always a benefit for a plus size!

The hemline is angled from high in the front to low in the back. My full midriff tends to pull hems up in front, so I added about an inch in length to the center front. I love how this vest falls over my curves. Both the ambiance rayon lining (which feels scrumptious!) and lines of the pattern allow for this.


The vest is a valuable addition to my winter wardrobe, as it layers easily over almost any top I've made. It's the perfect layer for keeping a touch warmer when the temperatures are cold. It can also be dressed up or down, depending on the occasion. I'm loving it!