Sunday, November 30, 2014

A Go-With-Everything Ponte Jacket


Back in September I realized I could really use a basic cardigan in my wardrobe, an easy-to-wear jacket that would go with (almost) everything. So I dug through my resource center and found a black ponte milled for Eileen Fisher, purchased from Sawyer Brook a couple of years ago. The fabric is rayon and nylon, and it has a soft hand and drape.


Now, basic isn't my normal thing. If you've been reading my blog for any length of time, you know I like asymmetry, uneven hemlines, and maybe a touch of paint. But not on this garment. I really needed it to be PLAIN. Enter McCall's 6996, view C/D, a simple cardigan with a wide center front band that becomes a collar of sorts. Without buttons or pockets. Really basic.

There is one nice design feature on the jacket - gathering at the center back seam of the band:


I like the extra interest this gathering gives, even though it's a small area that is almost covered by my hair.

A simple pattern and easy to sew fabric made for a quick project. Cutting this out and sewing it up was a dream. A dream in terms of easiness, but I have to admit, it was a bit boring for me to sew, and I was glad to get it over with. But it will be the perfect thing to grab when I need an extra layer over a t-shirt, and I expect to wear it a lot. I'm in the market for a really funky cardigan style jacket to make from ponte but I haven't found one yet. Maybe I'll have to design one that more suits my style.

The t-shirt I'm wearing with the jacket is also a recent make. The fabric is a rayon/lycra jersey, once again from Sawyer Brook. I had visions of combining it with other fabrics, but that never happened, so I decided on a top. It's a lot of print for me, but it will usually be covered by this jacket, or one of my black vests. I used my TNT t-shirt pattern, Vogue 8793, Katherine Tilton's zipper collar top. I made it with a neckband instead of the collar.


I've been on a quest of perfecting my TNT t-shirt pattern. I'm not quite there yet, but I'm getting close.

And that's the news from my little corner of the world. I have some other garments finished but I need more photos. We got 6" of snow Wednesday, so outdoor shots are out. The daylight hasn't been good here lately either, so I'm still waiting for a sunny day so I can take photos indoors. I'll be using my new camera and tripod. Wish me luck!

Friday, November 21, 2014

A Tilton Trio: Butterick 5891

Back in June I made Katherine Tilton's Butterick 5891. I liked the shape of the top so much I decided to challenge myself to making two additional, different garments from the pattern, as a design challenge. Here is the first version I made, following the pattern quite closely:


I made only my normal adjustments to the pattern for this version. I added some length to the body and the sleeves, did a forward shoulder adjustment and a rounded upper back adjustment. Just the usual things I do. It was unusual for me to not need to add width to the side seams. This style is very loose fitting, and there is plenty of room for my extra padding.

I absolutely love the collar on this top. I cut it on the bias and it sewed up beautifully.

One design change I made was to add a center seam to the sleeves, so I could insert a decorative flange and button:


Aren't the buttons fantastic? They are from Sawyer Brook, naturally. I was just thrilled when I saw how well they matched. The fabric is cross dyed linen, in a solid and a coordinating textural plaid. It's also from Sawyer Brook, a few years ago.


There's a funny story about this fabric. After deciding to make it up into this top I noticed on Martha's blog, Now Sewing, I had a kindred spirit. She had made the sleeveless top in this pattern out of the same fabric! I had the pleasure of meeting Martha a couple of years ago when she came to shop at Sawyer Brook. Our style aesthetic is quite similar, and sometimes I wonder if we were separated at birth!


***
Onward to version two, a collarless jacket:


Studying the pattern, I saw I could omit the collar - wonderful as it is - and use identical center front pieces for a v-neck look. The fabrics I chose are a black linen/rayon blend and a cotton printed with a dramatic dragon design, from Marcy Tilton. On this make, I rounded the center edge. It doesn't show up much in the print, but a close look at the buttons gives an idea of where the edge is.


It's a detail that might be wasted in this fabric, but if/when I make this again in a solid, it will show up nicely. I added the half-moon window pockets for a touch of whimsy. 


Topstitching throughout is done with dark red thread that matches the print.


Another great button match was found at Sawyer Brook. I love being able to sew with the buttons I work with every day!


***
And finally, version three, a longer length vest. 


This was one of those makes that changes as you work on it. I started out wanting a go-with-everything denim vest and ended up with one that has a lot of purple in it. None of the purple tops I have look good with it (seriously!), so I made a solid navy crew neck t-shirt. Unfortunately, it was at home, 1000 miles away, when these photos were taken. I had to run out to Macy's and make do with what I could find, which was the v-neck, 3/4 sleeve top you see here. I also forgot my navy pants. Let's just say this isn't styled the way I will wear it!

Anyway, back to the evolving make. As I cut out the denim fabric, I kept wondering if certain remnants in my collection would look good with it. I gathered some of them together, and came up with a combination I loved. They are a linen jacquard, a blue silk dupioni, a rayon batik, and a solid purple rayon twill. I decided to try piecing the center front panels with the fabrics, and once I got into it, I just loved the look. So much for something to wear with everything. But that's what love does, messes up the plan for an end result that's even better than imagined!


As the photo above shows, I used the already cut out front panels as templates for the piecing. I interfaced each of the fabric remnants to give them stability, then I cut out shapes and sewed them together. I worked on both sides at the same time, to keep them balanced. Once the vest was sewn up, I decided to add some hand stitching to bring more detail to the panels.


Wanting a little treat on the back, I inserted a long pieced flange in the center back seam, and topped it off with a button. Just a parting wink!


***

But that's not the end of this pattern. Today I started sewing another version of the top with the collar. It's looking good, and you'll be seeing it here soon!

Thanks to my wonderful baby sister who shot all of the modeled photos in this post. Lisa, you're the best!

Monday, November 17, 2014

Notes from a Fabric Whisperer

As a blogger, I'm always on the lookout for other blogs that might interest me. So when Martha of Now Sewing asked if I'd like to participate in a blog hop, I said yes. If you trace back through this particular branch of the blog hop, you'll find several talented fiber artists. Their work is inspiring!

Martha is an accomplished sewist who makes meticulously constructed garments. She has a bit of a funky style streak, and we often make similar garment styles. Tilton sister patterns are as much a part of her sewing as mine. What I admire most in her creative work is her Sashiko stitching, which she uses to embellish garments, quilts and wall hangings. Martha has inspired me to practice hand sewing and to incorporate it into garment construction. Be sure to visit her blog, if you're not already a regular.

Now, for a bit about me.


What am I working on? 
Today I cut a top out of these two fabrics, using a Katherine Tilton pattern. (I'm not going to disclose which pattern just yet. You'll have to wait!)


These cottons are double cloth, so I had four sides to choose from. The challenge was to use all four sides without any of them looking predominant. I think I did a pretty good job of including each of them in the top. Look for finished garment photos in a future post.

How does my work differ from others of its genre? 
I consider myself a garment maker. My work is distinguished by my use of asymmetry, unusual hemlines, and unique silhouettes. The addition of printed images, either silk screened or stenciled, separates me from most other sewists.

Why do I create what I do? 
Fabric and garment sewing have been part of my life for over 45 years. Knitting came later, but quickly fit in. I'm happiest when fiber of some sort is flowing through my hands.
I added printing with stencils and silk screens to my creative work as a means of making unusual garments that make a statement. I've grown to love the painting process, and look forward to it as a time of play. Recently, I'm enjoying some simple freehand painting, adding a distressed look to the fabric. Here is a piece of linen I painted back in July:


How does my creative process work?
I don't have a very structured method for creating new things. I usually don't know what it is I'll be making next. 
When choosing a new project, I often spend a couple of hours sorting through my fabrics or yarn, listening to what they say they want to be. That may sound wacky, like some sort of fabric whisperer, but experience has taught me I can't force a fabric to be something it wasn't designed for. Every fabric in my resource center has characteristics that lend it better to one particular use than another. The process of determining what type of garment to make with which fabric or yarn is critical to a successful finished garment. Once I have a good idea of what I'm making, I think about design details and whether or not to embellish the garment with paint or hand stitching.
Printing happens only if a garment is a good canvas for it. Sometimes the fabrication does not lend itself well to being printed. Sometimes printing is not going to enhance a style. Also, wearing printed items is fun and playful, but an entire wardrobe of paint embellished garments would be very silly!


With that, I'm going to hand the baton over to Louisa, of Damselfly's Delights. Louisa inspires me with her energy to pursue several different but intertwined creative endeavors. She sews, she knits, she spins, she dyes fabric and yarn, and she grows the plants she dyes with! I'm sure I'm missing another one or two of her creative skills. So get on over to her blog to learn about this multi-talented person!

Friday, November 14, 2014

A Copy of Two Copies

Say what?! A copy of two copies? It's simpler than it sounds. Both Gayle and Shams copied a ready-to-wear tunic. I saw their versions, fell in love with the design, and copied them. And here's my copy:


This is made with three fabrics from Marcy Tilton - red rayon jersey, black and white dotted jersey, and printed mesh knit. They were great to work with, and the top went together fairly easily. The only changes I made to the design were to angle the hem and add a cowl neckline rather than a funnel neckline. I used my tried and true t-shirt pattern as the basis for the draft, and made changes for the details.

The cowl is simply a tube, applied to the neckline as you would apply a neck band. It is single layer, and I left the edge raw:


I've just realized my photos don't show the drawstring detail very well. Here's a close-up:


This is definitely my favorite detail in the garment, and it could translate easily to many different tunic and top designs. It was very straightforward to make, so I'll try to detail the process here.

First, I added an extra 5/8" to the seam allowance in the area that would become the drawstring channels. That gave me a 1-1/4" seam allowance, enough to make a 5/8" channel. Before sewing the seam, I pressed the hem allowances up. (This step is critical. There is no way to turn up the hem once the channels are sewn, so it must be done now.)

Next I made two drawstrings, sewing one end closed on each one. Then I got out some trusty Steam a Seam and applied it to the long edge of both casings. I laid the drawstrings inside the casings, leaving the raw edges extending out of the tops of the channels. I then pressed the Steam a Seam edges so they would hold it all together.


Off to the sewing machine, where I attached my topstitching foot. Starting at the seamline, I stitched across the top and down the side of each channel. That secured the drawstrings at the top, and enclosed them in the channels.


And that's all there was to it. Keeping the drawstrings out of the way while sewing the channels was the most difficult part. I suppose the channels could be stitched, then the drawstrings threaded through, and the top of the channels sewn shut. But this accomplished it all without having to do the threading.

Attaching the flounce was also very easy. It is simply a large rectangle of fabric. I cut away the lower front at an angle - easy to see in the top photo above. The side seam is sewn, ending at the top of the angle. Then the long edge of the rectangle is sewn to the angled side seam allowance, breaking the stitching where the "normal" side seam ends.

Yes, I am *this* happy when wearing this tunic. It is super comfortable, and I love the whimsy added by the details. Thanks to both Gayle and Shams for inspiring me to make this. I'll definitely be sewing it again. I'm thinking a solid color next time, maybe with a funnel collar...

Wednesday, November 12, 2014

Another Funky Shirt for Lisa


She isn't always so serious. And I don't always hold the camera so crookedly!

This is my sister Lisa, wearing a linen, rayon and cotton shirt I funked up back in July. She loves it, and gets lots of compliments when wearing it. I swear I think I could make a dozen of these and sell them on the street!

This was a refashion only in part. The shirt is made using Diane Ericson's Nuevo Shirt pattern, which I've used many times. The fabrics are a black linen and a teal and black rayon challis from Sawyer Brook. The accents are a cotton shirt I cut up. New, from TJ Maxx. Not cheap, but the colors worked great!

The hottest feature on the shirt is the pocket. 

This was as simple as it looks. I cut the sleeve apart and made it into a patch pocket, maintaining the pleats for the length of it. I changed the buttons so they all would match. 


There was enough of the shirt fabric to cut the back yolk on the bias, in two pieces. It's a nice effect with the stripes, and it fits Lisa's rounded upper back well. The lower back has a center pleat. And there's a touch of bias cut challis piping running down the center of the sleeves.


So that's it. A relatively quick make that was fun to sew. And Lisa says it's fun to wear!

For those of you waiting for photos of Lisa wearing the Refashioned Men's Shirt I made back in June, I finally have some!


I'm not sure which of these I like best, as each has details I love. I think there are more of these shirts in the future, probably starting with the pattern rather than with a shirt. The fit is just better that way. 

If you like to play with your sewing, I highly recommend a project like one of these. You can get creative without going way out of your comfort zone, and you'll find you really enjoy doing it!

Thursday, November 6, 2014

Photos, Photos! I've Got Photos!

Finally, I have photos of the garments I made during the summer and early fall. I visited my photographer sister in Indiana last week, and we had a couple of photo shoots, where I modeled about ten garments. She did a fabulous job and I'm eager to show you what I've been up to. But where to start?

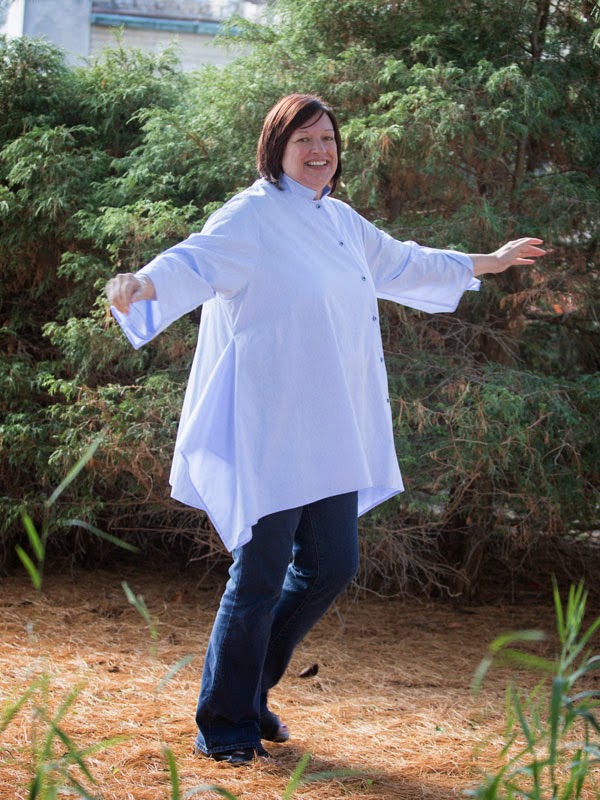
Let's begin with the most out-there-at-the-edge-of-my-comfort-zone garment, the shirt designed by Liz Mizono (Vogue 1274):


Want to fly with me, anyone? Seriously. this shirt contains a. lot. of. fabric. And I'm not sure how great I look with all of that fabric around my midriff and hips. Funny thing is, I never tried folding the flaps back, as on the pattern. I think they probably wouldn't be wide enough to meet in the back without making the shirt too tight on me. Honestly. So I just left them to hang. Which looks great while twirling, but I get dizzy easily, so I'm not sure how much I will wear this.


This was a really fun make, and I found no problems with the pattern. I followed the instructions as written, including the french seams. I added a few inches of length just above the side drapes, but the sleeves were good as is.

The fabric is a shirting weight cotton from Homespun Boutique in Ithaca, NY. It's a really beautiful piece of goods. I love how well the buttons match (from Sawyer Brook, of course).


The sleeve is finished with a drape, echoing what's going on at the hip. A nice design touch!


Diane Ericson has used this pattern several times to great effect, proving it's a fabulous starting point for design excursions. I'd love to work with it more, but first I'll have to see how I like wearing it.

This shirt is crying out for some skinny pants, rather than these jeans. I don't own any leggings or skinny pants - another comfort zone issue - but I'll be buying or making some before spring. That's the soonest I'll be able to wear it, as autumn has set in here in New England. So it will be a few months before I know whether to get the pattern out and play with it, or file it in the archives.

Is this pattern languishing in your library? Do you want to make it but don't quite dare to do so? Or, have you made it and found you like it, or hate it? I'd love to hear your thoughts on it!