Sunday, August 28, 2011

Slumpy Tote

For some time, I've wanted to make a fabric tote that would stand up on its own, like a good leather one will.  I knew canvas would be a good bet, but that wasn't the look I was going for.  I also knew the fabrics I chose, a shirt-weight cotton and black linen for trim, were not a good bet for stiffness or durability.  But style won over sensibility, and I moved forward with the project.  I hoped that by reinforcing it with lots of interfacing,  I would have a bag that would last at least a season.  At first glance, I thought I might have achieved it:


It didn't take long for me to see it wasn't going to stand as straight as I had hoped!
When loaded, it prefers to slump.  But I still like it and have carried it daily for nearly two months now.

I had been looking for fun fabric combinations in my stash and at Sawyer Brook Fabrics (where I work), when this gorgeous striped shirting arrived.  My penchant for purple and love of stripes had me sold on it right away.  It was a done deal when I saw how well it coordinated with another shirting cotton from Sawyer Brook, which became the lining.

I had been playing with an out of print Vogue pattern, 7463.  I like the shape because the sides taper a bit.  The original style is rather plain:
  
I decided to miter the stripes, which really pumps up the appeal.  It was painstaking, but well worth the effort.
Wanting a really sturdy bottom that didn't sag (unlike my own!), I inserted a piece of non-corrugated cardboard I had purchased a few years ago at an art store.  It's more of a paperboard, I believe.  It's gray, and the layers can be peeled apart with effort.  Anyway, my DH cut it to the size I needed, and drilled holes so I could put feet on the bag:
To make the fabrics more durable, I fused a medium-weight interfacing to all of the body and lining pieces.  For stiffness, I lined the shell of the bag with heavy Craf-Tex interfacing.  This gave the bag enough support to stand upright on its own.

There is one zippered pocket in the pattern.  I added 5 more.

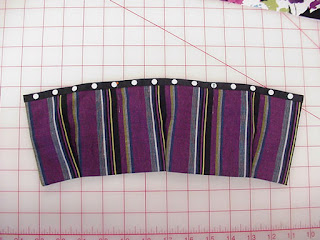
I wanted some gusseted pockets for my glasses, cell phone, and date book.  I fashioned this from one strip of fabric, and made small tucks to form the gussets.  The polka dot ribbon trim adds some stiffness to the edge, and a touch of whimsy.

Knowing that weight on the sides of the bag would cause it to slump, I stitched the pockets low in the bag. In hindsight, I wish I had sewn them even lower, so the contents would rest on the bottom of the bag and reduce strain on the side.

I wanted a flat pocket to carry papers (bank deposit, mail, etc.), so I added that to the other side of the lining.  A smaller pocket is attached to it - a handy place for my car keys.  I also attached a key fob on a long strap to the top edge of the bag.  I keep my work and studio keys on it, and it has become my secondmost favorite feature of the bag.  With the long strap, I can pull it out and unlock a door without having to remove the keyring from the clip.  Very handy!

My favorite feature of the tote is the water bottle bag I constructed. It is interlined with two layers of needlepunch fleece for insulation, and lined with PUL - a knit fabric with a water resistant coating (popular for diaper covers, I believe).

I sewed this into the side seam of the lining, so it keeps the bottle standing upright and easily accessible.  This feature has been wonderful.  No more water bottle sweat on the other contents in my bag, and it helps keep the water cold.  I'll definitely include this feature in the next tote I make!

Before inserting the lining, I crafted ring tabs from my linen trim, using a template (cut from a manilla folder) to press the edes in so they would be even:

I like the additional interest the tabs make on the exterior of the bag.  I placed the rings so both fabrics could be seen through them.  This design element turned out to be a flaw.  In spite of all of the reinforcing I had done with the interfacing, the tops of the tabs became stress points when I held the bag by the handles, creating a horizontal fold between the two tabs.  Basically, the top of the bag turned inward, and the line created by the stress became a ridge.  Sooooo, I topstitched the straps to the top edge of the bag.  This took care of the stress issue, although it doesn't look as nice.  If I use this pattern again, the rings will need to be attached at the top edge of the bag.

The webbing I used for straps is from M & J Trimming in New York.  I couldn't find any locally that was the correct width to fit the rings.  The webbing is very sturdy, and doesn't crumple in my hand.  Very good quality; I highly recommend it.  Several people have asked why I didn't make the handles longer, so the bag could be carried on my shoulder.  After having surgery on both shoulders years ago, I don't carry anything on them.  I cut the straps long enough for carrying the bag comfortably on my arm or in my hand, which works for me.

Here's a peek inside my completed tote.  It's almost a shame to have this pretty lining covered by all of the stuff I put in here, but it makes me smile when I catch a glimpse of it. 

This was a very time-consuming project because of all of the features I added, but it was well worth the effort. I love carrying it.  And when it becomes too worn for everyday use, it will make a great knitting bag!

Wednesday, August 24, 2011

My Heart Pounding with Passion

Yesterday morning, my eye was caught by a book of poetry in my bookcase.  Trusting this intuitive spark, I lifted the volume from the shelf, leafed through it, chose a page and began to read:

Seven weeks away
from the New Hampshire desk, on the last day
of our trip, in Sapporo,
we ate noodle soup with the head
of the Hokkaido
Historical Museum.  In his good
English, and with
embarrassment, the director desired us
to check the grammar
and diction of a photograph's caption
he had composed in English -
and his two sentences lacked one
"the".  But I also noticed
that if he reversed the order
of clauses, the first
sentence would gain energy; the second,
turned into a dependent
clause, would compress the whole to half
the words and make a witty
shape.  My pencil made loops, circling
new orders of diction
and style, my heart pounding with passion.

from The Old Life,
 by Donald Hall
A native New Englander now well into his eighties, Donald Hall is one of my favorite poets and essayists.  Much of his poetry is elegaic, and, therefore, a bit sad.  But his reflections of life on his grandparents' New Hampshire farm, where he has now lived for decades, meet me at my heritage, and make me smile.  My parents came from farming families, and ran a dairy farm for the first 10 years of my life.  They, too, are in their eighties, and reside on a parcel of land they have owned for nearly 60 years.  Mr. Hall's portrayals of everyday life and of his love for home never fail to move me.

But I digress.  The account I read yesterday, of a moment during a trip Hall took to Japan, sings to my creative spirit.  It is an inspiring glimpse of a person being who he is, performing his life's calling.  In the midst of a lengthy vacation, away from his writing desk and the daily disciplines of a writing life, a serendipitous opportunity drops him smack into the middle of his art.  The easy task of checking the grammar and diction of two sentences become an affirmation of his creative talent.  In working with a mere caption, he comes to glory in the joy of the creative process, in his excellence as a crafter of words.  The mundane becomes sacred.

I can see him at a table in Japan, reading through the caption, then adding a "the".  Then I see his energy shift as divine inspiration flows through him, enabling him to recognize the creative potential of the words.  As he makes loops and circles with his pencil, I feel his joy, his thrill with the pleasure and satisfaction that come with creative efforts.  I experience this same joy when I see the potential of a certain combination of materials, and allow creative energy to flow through me as I work and play and finalize the project.  Mr. Hall transforms words into art.  I transform fiber and yarn into art.

For me, living a creative life means consciously allowing the inspiration of the Universe to flow through me.  It means being present, aware of my surroundings, awake to creative opportunities, and open to challenges my environment or circumstances bring.  It requires discipline, which I am slowly developing.  It means taking risks.  It requires practice, practice, practice.  Most important of all, it asks for play; a romping spirit that revels in the joy of creating.

Donald Hall has figured it out.  I'm learning to do the same.  The reward is feeling fully alive, deeply satisfied, my heart pounding with passion.

Wednesday, August 10, 2011

Trillian is Growing!

Help! My sewing mojo appears to have gone on vacation.  It was reportedly sighted on the nude beach in Provincetown, reading a sleazy novel and getting a good burn on.  And ogling the scenery.  I sure wish it would come home.  There are garments waiting to be designed and sewn!

It's times like this I'm really glad I learned to knit.  Lately, I've been knitting a little bit every day, and I'm loving how this scarf is progressing.  The looooong triangular shape will be very fun to wear.  I'm picturing it wrapped twice around my neck, with the ends hanging in front.  It will continue to get wider as I knit, but the corner angles will remain the same.  Very long and sleek!

As the scarf widens, the stripes become more and more narrow.  I expect it to grow twice as wide as it is now, so the stripes may be less than 1/2" wide at the end.  The varied stripe widths will give added interest when the scarf is wrapped.

I'm working into the second repeat of the color sequence, so all the colors are visible now.


I'm a color fanatic, and I dig unusual color combinations like this one.  Combining brown, blue and lavender in one piece is somewhat of a surprise to the eye.  Color wheel knowledge, however, explains why it works.  Brown is actually dark orange, which is opposite blue on the color wheel.  That makes them complimentary - they contrast with one another and create drama and movement (and say nice things to one another).  The two of them are far more interesting together than on their own.  Lavender sits next to blue on the color wheel, which means the two colors are harmonious.  They share a common color - blue - but are slightly different from one another.  And, lavender contains enough blue to look good with brown.

The blue in this yarn is quite warm, as is the brown. The lavender is very cool, leaning more to the blue than the red side.  Some say mixing warm and cool tones in the same piece creates disharmony, but I disagree.  Even though the lavender is cool and the blue is warm, they appear to "go together".

What I find most interesting about this color combination is what happens when you remove one of the colors.  Blocking out the lavender, brown, or blue, one at a time, reveals nice color schemes, but seeing all three together creates lots more interest.  They play off each other and the neutral whites, grays and blacks to form a quiet yet lively palette.

I have two skeins of yarn, so this scarf will continue to grow.  The one I started with had a knot joining two pieces at different areas of the color repeat.  I had to wind off a ball of yarn until I came to the same color in the repeat.  I'll need to join yarns again soon.  This will give me the opportunity to reverse the direction of the color repeat.  I think I might do this, as it will increase the interest of the color flow.  Another reason I love knitting with Noro!

Monday, August 1, 2011

Knitting on the Front Porch

My Parents' Front Porch
Eric, Poco and I just spent a long weekend visiting friends and family at my parents' home in Ithaca, NY.  Their wonderful front porch was the scene of much socializing during our stay.  The rocking chairs my sister recently gave them are a big hit.  They have great back and leg support, they're just the right height for tall gals like me, and the seat cushions make them soooo comfortable!
View from the Porch
The giant shag-bark hickory trees in the front lawn provide abundant shade and secluded perches for the many songbirds who visit the feeders.  The house is set back far from the road (which is along the telephone poles toward the top of the photo), so it is quite serene.
Poco, Rose of Sharon, and Pergola

Gardens and Deck at Back of House
My mother invests much of her energy in flower gardening and watercolor, her creative passions.  The many beds and plantings on the property keep her busy, and she thrives on this form of self expression, eagerly anticipating every growing season.  It's not unusual for her to spend hours a day outdoors, tending her gardens.  I snapped a quick photo of her at work Monday morning:

Mom

View from the Deck
In case one tires of the view from the front of the house, the deck view is equally beautiful.  The views are expansive, and the setting is quite private and peaceful.  Wild turkeys roam the adjacent fields and woods, and a day without a deer sighting is unusual.  (Unfortunately, they love Mom's flowers as much as she does.)

That's a pond behind the trees on the left.  It is swimable and stocked with fish.  This home was built in the late 1990's, in a field that was part of our family farm.  Any hints that my father still loves to drive his tractors?  Mowing the grass is his favorite passtime around home.
Dad, Dressed for a Trip to the Dump
Children are never bored here.  The pond is great for the older ones, while the toddlers love to climb and play in this fabulous tree house:

Playhouse
These lovely grounds were the perfect locale for a knitting weekend.  Imagine how wonderful it was for me to have lots of free time to while away the hours on the porch and the deck, with needles and yarn in my hands!  Sitting in view of colorful flowers, with birdsong in the air and cooling breezes passing by was simply divine.  The experience reminded me of how much I am nourished by being outdoors!

I purchased some yarn and a cool pattern just for this trip, and made quite a bit of progress on my new project:

Trillian Scarf
This quietly colorful self-striping yarn is Noro Taiyo Sock, a cotton/wool/nylon/silk blend from Japan.  I love knitting with Noro yarns.  Eisaku Noro's color sense is quite acute, and I can always count on creating a stunning garment from his yarn.  The thick/thin quality adds texture, and the fiber blend gives it an organic (as in "natural") flavor. 
Noro Taiyo Sock, Color No. 01
Such luscious color!  Rather than dying the yarn after it is spun, the folks at Noro begin with several different colored rovings (unspun fiber).  As the rovings are spun, the colors are gradually switched.  One long section of color blends into the next, which results in gradual color changes as the yarn is knit.  The colors are repeated in the same order, in about the same lengths, but since it is not a fully mechanized process, there is some pleasing variability. 

Gradual Color Changes and Rich Texture
I haven't yet reached the blue and brown in the yarn, so just imagine how rich the combination will be!  This is the fun of knitting with Noro - watching the colors appear in the knitted piece.

This pattern is quite simple, and a joy to knit in a striping yarn such as this.  The pattern is named Trillian, after a female character in the Douglas Adams classic, The Hitchhikers' Guide to the Galaxy. Martina Behm designed it, and it can be purchased on Ravelry.com.  The scarf is about a foot long now, but when finished, it will be very long, so that I can wrap it around my neck a couple of times and let the ends fall long in front.  It has a simple lace edge, and an asymmetrial triangular shape.  The pointed end where I began knitting forms the narrowest angle in the triangle.

Asymmetry, texture, rich coloration, and stripes - four of my favorite design elements!  Knitting this scarf will continue to be a rewarding, relaxing experience.  Stay tuned for more photos as the scarf grows!

Poco Surveys His Domain Away from Home