Friday, November 15, 2013

Where Have I Been? Or, What to Do When The Urge Vanishes

Seven months without blogging. What happened? A lot. Where have I been? Here. What have I been doing? Knitting like a fiend. Recently, sewing like a fiend. Let me explain.

In May my sewing mojo took a hike, went on vacation, was missing in action. Gone. A few feeble attempts at accomplishing something in the studio were in vain. I simply had no desire to sew. None whatsoever. So, I decided that aspect of my creative life needed a break. And I started knitting. I knit like crazy, and shawls appeared like bunny rabbits. Lots of shawls - eight completed so far this year, three more currently on needles. I couldn't get enough of them!

Stephen West's Barndom shawl, before blocking.
Knit with Breathless cashmere/merino/silk yarn.
My absolute favorite yarn and shawl of all time.
This knitting fever lasted all summer, into September. So did the sewing heebie jeebies. No sewing for four months. The entire summer my studio sat idle. And I knit shawls. And socks.

Entwined cabled socks. Knit in Hazel Knits Entice
(merino, cashmere, nylon sock yarn).
Letting the sewing landscape lie fallow was a good move. I firmly believe you can't force creativity. If the urge isn't there, there's no making it happen. Letting it rest lets other things come to the forefront. And it's not gone, it's just hibernating. It's lying quietly, brewing ideas, growing new roots and shoots, preparing to sprout.

And then one day the creative urge returns. For me it was mid-September. Subtle at first, it quickly gained momentum and I found myself in the middle of making a coat. I finished it mid-October, and started another, which I completed today. And now a jacket is under way. My sewing mojo has definitely returned, and the creative energy is flowing freely. It's a great feeling!

Meanwhile, knitting has taken a back seat. I still dabble in it, but I'm not knitting for hours every day like I was. My creative energy has shifted, and that's ok. I finally feel like blogging again - another creative pursuit that ebbs and flows. So here I am, and that's what happened over the past seven months.

*****

In an effort to catch up on blogging, I'm showing two bags I made in April and May. I have only one photo of the first, view B of Diane Ericson's Pacific Purse pattern.

The fabrics are silk duppioni, linen and quilting prints. The button has been in my stash for many years, and it was the inspiration for the bag. The flap and most of the back are stenciled using Diane Ericson's Spring Leaves stencil and Lumiere paints. To create the stripe effect, I used strips of sticky-back paper (like Post-It Notes) to mask part of the fabric. Then I did the stenciling, and carefully peeled the paper away. This could be done with masking tape, also. I added some hand embroidery to add some definition.

I really like this bag, but I never carry it as the greens are too yellow for my coloring. They just don't look great with my wardrobe. I don't want to give the bag away, either, because I like the button too much. For now it will stay as it is, but I suspect the button will some day be removed to be used on a jacket. In the meantime, it can enjoy living on this bag.

The second bag is one of my favorite painted creations. I used both stencils and silk screens to embellish this tote.


The basic shape was achieved using Butterick 5866. I added the pockets on the front and back, plus some in the interior. The fabrics are deep purple cotton shirting, lavender wool gauze, linen, and silk organza. I especially like the organza overlay that is crinkled and embellished with buttons.


That's a foiled damselfly at the top left. I used the foil on a couple of moths as well. The writing on the front is bleached using a dye resist through a silk screen. All of the screens used are from Marcy Tilton. The eucalyptus stencil is from Diane Ericson. It was really fun to combine purple and pewter paint in the stenciling.


The lining fabric is a textured linen/rayon blend, and I added my usual tucked slip pockets to the zippered pocket that came with the pattern.


Once completed, I realized I don't care for the drawstring closure on the top. There's no way I'm going to use a tote with a drawstring for everyday use. So this became my knitting bag, and it's carried many a shawl-in-progress over the past few months.


That wraps it up for this catch-up post. Thanks to those of you who checked in on me during my silence, and visited the blog despite there being no current postings. I love the feedback you readers give, and I missed the online sewing community I've found through this blog. I'm so glad to be back sewing and blogging!

Wednesday, April 24, 2013

Purple Stripes on the Double

Apologies to my regular readers for not blogging in so long. I seem to go through stretches where I'm just not inspired to post photos of myself online. Here's an attempt to get back into a routine.

Back in February I made two different garments using purple striped fabrics. The first is this knit top:


This fabric is a gorgeous purple and black striped double knit from Marcy Tilton. It has a beefy hand and was a dream to sew. I used Katherine Tilton's V8710 , which I've made a couple of times before. I raised the neckline and added a twisted, loose turtleneck to this one, making it perfect for winter wear.

Some non-plus size sewists have complained about the fullness of this top, but I really like it. There is a lot of extra fabric, however, so if that's not your ideal, I recommend slimming it down.


I enjoyed wearing this in the cold months, and will get a lot of use from it next fall and winter. It's really comfortable and cozy!

The second garment is this shirt, made from a tone-on-tone striped cotton shirting, also from Marcy.


The pattern is a hybrid based on an out of print Sandra Betzina shirt pattern, with details from Diane Ericson's Nuevo Shirt pattern (sorry, I can't get a link to the pattern itself), and her out of print Just Pockets pattern. I love, love the pocket, and the interesting cuffs:

The layers of the pocket are assembled and basted on top of the base piece, then the entire thing is inset into the shirt front (rather than laid on the shirt and topstitched). It's finicky, but I really like the look.

I was hoping to really like the shirt, but I have to say I don't, just because I don't like how woven fabrics drape on my body. There always seems to be too much extra fabric in a shirt, and I feel sloppy wearing one. Maybe it's because I haven't found a good fit in the chest and shoulder area. Or maybe that's just how a shirt fits. I don't know. What do you think?

By the way, those are rounded square tagua nut (a.k.a. corozo) buttons, from Sawyer Brook. They are a perfect color match and I love their angularity on this garment, as the design lines are angular too.

There are several more items in line for me to blog about, including a jacket and two bags, so stay tuned!

Wednesday, April 10, 2013

And the Winners Are...

My husband drew two names from the pile for me, and the winners of the Plus Sized Pattern Pyramid Give-Away are (drumroll, please):

chiralcraft and megan

Congratulations to the winners. Please send an email with your addresses to me at whistlingdixie "at" comcast.net, so I can send the patterns on their way.

Thanks to all who played along. Be sure to follow Laura at Chiral Craft and Megan at The Green Violet for more chances to win!

Tuesday, April 2, 2013

Plus Sized Pattern Pyramid Give-Away!

Hurray! The infamous pattern pyramid started by BeaJay made its way to me in Massachusetts last week. Here is what I received from KC:


How about that fabric bag she made for me? It will be great for knitting projects or packing.

Since the collection is thinning down (pun intended), I decided to sweeten the pot with some unloved patterns from my collection:


If you'd like the opportunity to choose a couple of these patterns for yourself, leave a comment. I'll be drawing two winners on April 10th, so be sure to check back then to see if you've won!

Friday, March 1, 2013

Black and Plum = Yum

Finally, a photo opportunity - when husband was available and light was bright. I modeled this top and vest, made in December and January:


Let's begin with the top. Both fabrics are from Marcy Tilton, and have been  marinating in my collection for a while. They were separate purchases, but when I saw them together I knew they would be perfect in one garment.


I love the idea of combining mesh and opaque fabrics, but as a plus size gal, there's little of my body I want to expose through mesh. I pondered the challenge for a while and came up with the idea of a cowl and scrunchy cuffs.


I love the sheerness and gathers of the mesh against the tiny polka dotted rayon. The mesh is very light and easily collapses into a frothy ring around my neck. Fun!

I used a TNT pattern for this, and simply cut the cowl to fit the neck opening. It is quite high; if I pull it up it entirely covers my head. The mesh and jersey were a really easy sew, and the top is a delight to wear. (Of course it is. It's purple!)

The vest was made using an out of print pattern from Diane Ericson:

The teatowel vest is certainly outdated now (was it ever exactly fashionable?) but I think I can get a lot of mileage out of the other two designs. I used view A.

I started with a gorgeous wool crepe from Sawyer Brook. Wanting to take advantage of several textural black fabrics in my remnant collection, I decided to design pieced lapels. The pattern includes only a long, straight lapel piece. Here is the pattern mock up as I designed it:

And here are the lapels I spent hours designing, cutting out and sewing together, only to decide I didn't like the look:

If you click on the photo to enlarge it, you'll be able to see the textures a bit better. The reason I nixed these lapels is they were just too much. I didn't like the choppiness of the edges, even though I had staggered them. In a nutshell, it just seemed too crafty. So, I backed off and went for the streamlined look of the original pattern piece, and chose one of the textured fabrics. 


The vest has a fun construction detail. Except for the shoulder seams, all seams are overlapped and topstitched. To do this, the entire vest is lined to the edge and turned inside out. Then the back pieces are overlapped and stitched, and the sides follow suit. This means lots of pin fitting, and making sure of where the seam lines will be before attaching the lining. The overlapping leaves little vents at the lower back and side seams.


I like the asymmetrical back and the button detail. The seam gives a nice vertical element to the back, too. Always a benefit for a plus size!

The hemline is angled from high in the front to low in the back. My full midriff tends to pull hems up in front, so I added about an inch in length to the center front. I love how this vest falls over my curves. Both the ambiance rayon lining (which feels scrumptious!) and lines of the pattern allow for this.


The vest is a valuable addition to my winter wardrobe, as it layers easily over almost any top I've made. It's the perfect layer for keeping a touch warmer when the temperatures are cold. It can also be dressed up or down, depending on the occasion. I'm loving it!

Thursday, February 14, 2013

Happy Valentine's Day!

I'm so glad we celebrate St. Valentine in February. It offers the perfect opportunity to fill the day with gorgeous color!


This very unstructured jacket is made from a wool jersey from Marcy Tilton. The pattern is also hers, Vogue 8430. I've made it as a vest twice, most recently a year ago. The jersey was semi-felted, and I washed it to felt it a bit more. All of the edges are raw, and the fit is very loose. I'm not crazy with how this looks; I think I'm kind of done with unstructured for now. It just seems sloppy. I really wish I had done something else with this gorgeous fabric, but it's too late now.

This will be a good layer for early spring and fall weather. I wore it to work today but it became a tad too warm as the day went on. It looks good overlapped more in the front and fastened with a pin. Sorry no pictures of that. My photographer has been very busy at work and photo ops are short and infrequent!

I think I'll be moving toward more structure in my sewing, leaving the draped front Tilton patterns behind. I'm currently working on another linen jacket, one I can wear in early spring. You'll be seeing that one soon!

Sunday, February 10, 2013

Storm Update and Double Bag Prototype


The Blizzard of 2013 was a whopper of a storm, dropping 27 inches of snow on our town in central Massachusetts. The wind created some strangely beautiful sculptures on our cars. My sedan is parked ahead of the Volvo, close to the garage, and that's a 3 foot drift on top of its roof. Quite a powerful wind!

We're all dug out now and the landscape is dominated by huge piles of snow everywhere. We are grateful to have kept electricity throughout the storm, unlike hundreds of thousands of people in the southeastern part of the state. I can handle shoveling snow and braving the cold, but I really dislike having no power. So, we were fortunate.

One drawback to renting a studio outside the home is not being able to go there in the midst of a storm. I filled Friday evening and all day yesterday with knitting, which helped pass the time but didn't truly satisfy. I longed to sew, and was happy to spend 7 hours in the studio today, working on another linen jacket. More about that in a future post.

There are still some items I made in November and December I haven't blogged about, so I thought I'd show you some bags I made back then.


You may recall the double bags I made last September using Marcy Tilton's Vogue 8590. I had good feedback from others concerning the concept of two bags that hook together for pairing up. But I had an idea to change the shape into a clutch, making them a perfect size for tucking into a large tote.

This also grew out of some really great wristlets I've carried for several years, made by Hobo International. The bags have wallet-like interiors - zippered and open pockets, and slots for credit cards. They're also large enough for a tissue, lipstick, and phone. There's a wrist strap for carrying, but I usually stash mine under my arm. These bags are the perfect solution for running errands, when I don't need to take my entire tote into a store. I just grab the wristlet and go.

Using Marcy's pattern as a starting point, I melded both ideas into one. I maintained the shape of Marcy's bag, but drafted it shorter in height and longer in length. I added a shoulder strap, but have to admit I don't usually keep it on as I prefer a clutch. I kept the exterior pockets, but added a wallet-like interior.


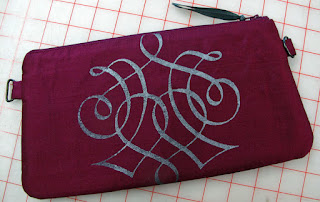
My basic everyday clutch is the gray and black one shown below. The lining is the same green silk faille used in my charcoal felted tote.  The black spherical motifs are painted using Marcy Tilton's "African Suns" silk screen.


The second bag is in shades of blue, gray and black. It looks great paired with the everyday bag. I often carry them together when going out for dinner.


I love the cotton jacquard used on the face of this bag. The back and side tabs are a gorgeous deep blue crushed taffeta that carries the blue color further.


Pleased as I was with this duo, I decided to make a third bag that would coordinate with the basic bag. This time I went with shades of wine and gray.


This side is made with a chenille and metallic brocade. The reverse is silk dupioni painted with another Marcy Tilton silk screen.


All of the fabrics I used are from Sawyer Brook. Several of them are remnants that I truly wish I had more of, as they work so well together.

These bags are really fun to carry. The interiors are all the same, so I can use any of them as a wallet/clutch. When paired together, I can switch which sides are on the outside, so there's a variety of looks that can be achieved.

I'm planning to make several sets of these to sell. I've got a couple of kinks to work out first, though. I'm having trouble finding the metal slide that's used to adjust the strap length, in the black nickel color. I can find gold and silver, but I really like the darker color with certain fabrics. I'm also toying with changing the location of the rings the strap clips on to, from the sides of the bag to the top. I'd really like them to tuck into the top of the bag and slip out when needed. Perhaps most wearers would use the strap all of the time, so maybe that's not so much of an issue. I just think it looks a little strange to have loops and rings on the sides of a clutch. Any ideas?

Friday, February 1, 2013

Vogue 1262: A Jacket Begun

I don't know what sensibility overtook me, but last weekend I decided to make a spring jacket. It must have been the drab winter that drew me to think about sewing for spring. Perhaps it was these noticeably longer days that bring promise of fairer weather (eventually). My normal sewing mode is making things I can wear right away, so it's been an odd feeling working on something I'll need to wait a few months to use. But it's also been fun to sew linen in winter, to be working with colorful fabric when all is gray outside.

A review of the fabrics in my collection is also partially responsible for the genesis of this jacket. I have several solid linens perfect for jackets. I chose a deep blue-teal one, and proceeded to pattern selection.

I've been wanting to make Sandra Betzina's Vogue 1262 for some time. I like the lines of the jacket, and the fact that I would need to do little pattern adjusting because her patterns go up to my general size.


Last weekend I traced off the pattern and did a fit using that interfacing pattern paper stuff - Swedish pattern paper, I think it's called? Anyway, the fit looked to be good and I liked the style on my body. I pressed and laid out the teal linen, only to discover it is too narrow for cutting this pattern. You see, the sleeve and back are one pattern piece, so the fabric needs to be wide. I considered adding a center back seam, but even then, the 54" wide teal linen was too narrow.

Sooo, back to the stash, where I realized all of my linens are in the 54" to 56" width range, and none of the pieces were long enough to cut out this fabric hog of a pattern. But then I came upon a pool blue mid-weight piece from Sawyer Brook (actually, three pieces) that had plenty of yardage for this project. By opting for a center back seam, I was able to fit the pattern on the fabric. That's how I went from deep teal to the pool blue you see here.


This is the double quadruple pocket welt, all ready for insertion. The pocket was a fun construction, and would be easy to adapt to other patterns.

Four rectangles are folded in half, the base ones are basted together, and the top ones laid 1/2" from the center fold. I didn't have a contrast fabric for the upper welts, so I painted them with silver Lumiere paint, using a silk screen from Marcy Tilton. You'll notice the silver is more pronounced toward the center of the piece. That's because the paint didn't go through the screen well, and I hand painted the stripes in with a small brush. (See, I do make mistakes!) Only 1/2" of the welt shows in the finished pocket, so I only needed to paint the center.

The next step is to make a window in the front of the jacket. It is shown here, with Steam-a-Seam II finger-pressed on it.

Working from the right side of the jacket front, I laid the welts under the window and steam pressed them, fusing them to the window edge. Careful edgestitching followed.


There is just one drawback with this pocket: it's a fabric waster. I think Sandra drafted it to make it easy to insert, but as you can see, the welt didn't need to be so wide. The pocket top and bottom are sewn to the top and bottom edges of the welt, but after sewing the sides of the pocket together, 1-1/2" is cut off the top of the pocket. Plus, all four welt pieces were interfaced (non fusible), so there are 8 layers of fabric in the welt area. I trimmed out the excess interfacing and graded the center two pieces of welting to lessen the thickness. I'm knit picking here, but I'd rather not throw out pieces of interfacing that could have been used elsewhere.

I really like the look of this pocket. The painting adds just a touch of interest, but isn't overpowering. I'm careful to not wear horizontal lines across the largest part of my body, but I think these pockets are quiet enough that they won't draw too much attention.

I started the pockets this afternoon, and have only to make a Hong Kong finish around the raw edges. (The jacket is unlined.)

I'll be working on the jacket all weekend, so I hope to have it near completion by game time Sunday night. Yes, I'll be watching. No, I'm not a sore loser. I'm not sore at all that our beloved Tom Brady et. al. will be sitting the game out. Truthfully, the Patriots got what they deserved in that last game. They fell apart. Good luck to both teams in the Harbaugh Bowl!

Monday, January 28, 2013

Knitted Color for a Gray Winter Day


It's been a snowy, blustery day here in Massachusetts, so I though we could use some color! This is a cowl I knit a few weeks ago. The pattern is from Knit Noro Accessories, a gorgeous book I recently picked up at my local yarn shop.


The yarn is one of my favorites, Noro Silk Garden, in two colorways. As you can see, it's a large cowl - large enough to wear as a shoulder warmer. I can also put a  shawl pin in it to hold it together more like a scarf. The slip stitch pattern is easy to do and results in the "bumpy" stripes.


With all of these gorgeous colors, it was really fun to work on.

The top you see it draped on above is a new one, made from Simplicity 3634. The fabric is a rayon lightweight double knit milled for Roberto Cavalli. The hand is beefy but the fabric surface is very smooth, much like a silk jersey. It's a delight to wear. Black can be overpowering on me, but I really wanted a black top to wear as a layering piece. This will be fine for that purpose. And it provides the perfect backdrop for the colorful cowl!

Wednesday, January 23, 2013

Keeping Warm: Knitting Projects

It's been a good winter for knitting, and I've finished several items in the past month or two. First off, a scarf/shawlette in the Wingspan pattern (free on Ravelry).


The yarn is Noro Silk Garden. The "wings" are created using short rows. It's a very easy knit that's adaptable to many gauges of yarn. I chose to pin it together at the ends, but it can be worn multiple ways. It adds a good dose of color to the dark gray top I made in December.

Next up, a funky cowl knit originally for myself, but given to my beautiful sister in a moment of weakness.


Those are I-cords knit on large needles. The yarn is luscious Malabrigo Rasta, and the pattern is Ropes Cowl (on Ravelry). This was a fun and quick knit. I love how well the buttons from Sawyer Brook match the hand dyed yarn. The cowl can be worn very neat and tidy, off-kilter like in this photo, or really messy.

Why did I give it away? It seemed a bit out of proportion for me, like the ropes needed to be a bit longer. And Melanie loved it. My local yarn shop still has the yarn on hand, so I might buy more and make another one to keep.

Last, but not least, are a cowl and mittens. And they're mine! 


I purchased this soft wool yarn at the Classic Elite outlet store a couple of years ago. The colors are a tad softer than in the photo. I love the black marl throughout, and the gradual color changes. The mittens were made using The Grand Plan for Mittens from Interweave magazine. The cowl was self-designed, using instructions from Entrelac by Rosemary Drysdale. It's my first entrelac project, and I'm not pleased with the bumpy edges, but I'm satisfied enough to wear it. The cowl and the mittens kept me very warm in today's single digit temperatures.

I love, love, love how well the buttons - from Sawyer Brook, of course - match the yarn. They were destined to be together!


One more project, a cowl, is waiting for photos, while several projects are in the finishing stages, so there will be more to come!

Monday, January 21, 2013

Felted Spirals Tote

Studio time in late November and early December was spent on designing and sewing a tote for myself. I knew I wanted it to be durable, roomy, and arty. Here's  the result of my efforts:


Yes, I got to play with the needlefelting machine I purchased last July. It's made by Simplicity, and is functional but not particularly well designed. For the money ($140 on sale), it was worth buying. It is easy to use and I could spend hours playing with it. I'm not sure how much I'll use it, but it's good to have it available when the felting urge hits.

The base fabric is wool melton from Sawyer Brook. The roving I used for felting was hand dyed by a friend who has a small yarn dying business. I pulled roving from two colorways that had lots of orange in them. No orange here, though. That's the beauty of working with roving; you can pull it apart to leave out bits you might not want in a particular project. After laying down the roving, weaving it where the stripes met, and felting it over and over, I felted some yarns in spiral shapes, and sewed on a multicolored nylon tape yarn and short rows of beads.


I love the colors of roving, and how they blend from one shade to the next. It adds a lot of dimension and depth to the design. I'm not much for glitz, but I really like the glimmer the beads add. Not wanting to overdo the design, I went with a smaller arty element on the back of the bag.


The chartreuse color is less vibrant in real life. It coordinates with the silk faille lining. I love a light colored lining because it allows me to see my stuff. There's nothing worse than searching through a dark lined bag!


That's a divided double pocket for my glasses and phone, plus a zippered pocket for keys. I inserted a piece of stable cardboard in the bottom and held it in place with black nickel-colored feet. (Sorry no pic.)


For durability and protection, I encased the bottom of the bag in leather. This was leftover from a vest a coworker made for a client. Janee was gracious to give it to me, and it's been languishing in my stash for a couple of years. I was glad to have it, as it protects the bottom of the bag from getting dirty. I also used it for the handles. It's super soft, yet strong, and feels really nice in my hands. This was my first experience with leather, and it sewed very easily. I tried a leather needle but found a denim needle worked better. I had no trouble feeding it evenly through my sewing machine, probably because I used my Pfaff's built in walking foot.

I used an old out of print bag pattern as a starting point, but I redrafted nearly all of it. It looks quite different from the original pattern photo.

The top of the bag is closed with a zipper. I had a waterproof one on hand from JoAnn's, and it looks great. Not that I needed it to be waterproof. But the tape on the waterproof style is very satiny, and the slide moves very smoothly. It was the perfect finish for this bag that was very fun to make and gives me a smile when I carry it!