Not much stirring around the blog lately, kinda like that classic Christmas tale. My sewing and knitting mojo have been running full force, but I've got a wicked case of blogger's block. I have several projects to show you, from bags to cardigans to tops, and will hopefully get posting soon.
Wishing all of my blogosphere (and physical world) friends a very happy holiday season, all of the best in the coming year, and, most of all, Peace.
Monday, December 24, 2012
Friday, October 26, 2012
Artistry in Indiana
Early this month, my husband and I drove to Bloomington, Indiana to visit family for a week. My two sisters live there, and my brother drove my parents out from upstate New York, so it was a family get together of sorts. It had been a couple of years since we were all in the same place at one time, and my parents are getting on in years (mid-80s), so having a few days together was very special.
We've visited Bloomington many times in the past 20 years, but this stay was unique because of a very special event, plus some impromptu artsy outings. I came home feeling very blessed to have experienced all of it.
The big event was a private concert with Sylvia McNair, a singer extraordinaire who has two Grammys from her years with the Metropolitan Opera. She now sings cabaret and show tunes, and her clear, strong voice is a delight to hear. If you like this style of music, I highly recommend checking her out on YouTube. Then imagine what it was like to hear her sing in a large dining room, with just 16 others. Very intimate, very special.

Sylvia had donated this mini-concert to a fundraiser for a local charity, and my sister was the winning bidder. The entire affair was a gift from my sister to each of us, but especially to my parents, who thoroughly enjoyed the evening. Sylvia is friends with my sister and several others in attendance, and it was a wonderful party.
I love seeing a person doing what s/he was born to do. No doubt about it; Sylvia is here to sing. In talking with her after her performance, she told me the most rewarding aspect of singing is seeing it bring people together. During one song, she noticed my mother reach over and take my father's hand. She said that is the greatest compliment she can receive, that recognition that what she does is bringing people closer. She's an extraordinary person!
The next day, we met and spent a couple of hours with John Bender, a well-known Bloomington native and businessman. Many decades ago, he helped two brothers start a little pizza company that went big: Pizza Hut. With many other entrepreneurial pursuits under his belt, he now owns a lumber company, where his sons work with him. Well into his seventies, he enjoys bicycling and has a passion for flying. (Rhonda, do you know him?) We met him at his large double hangar at the local airport to see his two airplanes, antique bicycle collection, and antique motorcycle and car collection. It was fun to walk down the automobile memory lane with my parents, who had driven some of the same models back when they were young. His collections aside, John's entrepreneurial spirit is inspiring.
Another day, my sisters, my mom and I stopped in at Bella Bella, the studio of artist Lara Moore. My sister was there to order a custom mirror for one of her bathrooms. She recently purchased a coffee table that is simply gorgeous. Lara gave us a quick tour and we were able to see a new piece in the works. Literally hundreds of layers of tissue paper are glued to a particleboard surface to create the designs. Liquid acrylic is then poured over the piece, layer by layer, until a thick, very smooth protective coating is achieved. It's a process developed by Lara, and she's been very successful with it. If you frequent arty boutiques and shops or art fairs, you may have seen some of her work.
We also went to Textillery Weavers, a local maker of woven throws. In addition to perusing the goods in their outlet store, we were able to watch weavers at work on both hand- and machine-operated looms. The 30+ year old business is owned and run by a wife/husband team. She designs the throws and is the creative force in the venture, while he runs the business end of things. They sell to stores across the country, so you may have seen their goods in shops. I came away with a steal of a deal, this chenille throw, woven on a jacquard loom.
Our stay ended with a fun evening at a local pub, listening to a fabulous band called the Vallures. What could be more fun than five women and a man playing and singing 60's music?! With lots of girl group tunes, matching dresses and retro hairdos, they were a blast!

On our return trip, we spent a night with my parents in Ithaca. Since we were there, how could I resist visiting my favorite independent fabric store, Homespun Boutique? I tried to be selective, and bought only what I would use for handbags, plus one garment for myself.
Beautiful ribbons from Renaissance Ribbon. So colorful! I can't wait to use them in bag linings.

Pleated silk, silk faille, linen and rayon jacquard, and silk stripe for bags.

A gorgeous purple cotton matelasse, which I hope to make into a long vest for myself. Scraps will be great for handbags.

And buttons! These are handmade from Fimo clay, then painted. I love the tiny script on them.

So ended our creative week away from home. Traveling through six northeastern states in early October was a visual delight. The foliage colors were spectacular! I returned with new-found vigor to make handbags, inspired by all of the creative people I met while away, and the beautiful scenery along the way. In my next post, I'll show you what I've been up to for the past two weeks!
We've visited Bloomington many times in the past 20 years, but this stay was unique because of a very special event, plus some impromptu artsy outings. I came home feeling very blessed to have experienced all of it.
The big event was a private concert with Sylvia McNair, a singer extraordinaire who has two Grammys from her years with the Metropolitan Opera. She now sings cabaret and show tunes, and her clear, strong voice is a delight to hear. If you like this style of music, I highly recommend checking her out on YouTube. Then imagine what it was like to hear her sing in a large dining room, with just 16 others. Very intimate, very special.
Sylvia had donated this mini-concert to a fundraiser for a local charity, and my sister was the winning bidder. The entire affair was a gift from my sister to each of us, but especially to my parents, who thoroughly enjoyed the evening. Sylvia is friends with my sister and several others in attendance, and it was a wonderful party.
I love seeing a person doing what s/he was born to do. No doubt about it; Sylvia is here to sing. In talking with her after her performance, she told me the most rewarding aspect of singing is seeing it bring people together. During one song, she noticed my mother reach over and take my father's hand. She said that is the greatest compliment she can receive, that recognition that what she does is bringing people closer. She's an extraordinary person!
The next day, we met and spent a couple of hours with John Bender, a well-known Bloomington native and businessman. Many decades ago, he helped two brothers start a little pizza company that went big: Pizza Hut. With many other entrepreneurial pursuits under his belt, he now owns a lumber company, where his sons work with him. Well into his seventies, he enjoys bicycling and has a passion for flying. (Rhonda, do you know him?) We met him at his large double hangar at the local airport to see his two airplanes, antique bicycle collection, and antique motorcycle and car collection. It was fun to walk down the automobile memory lane with my parents, who had driven some of the same models back when they were young. His collections aside, John's entrepreneurial spirit is inspiring.
Another day, my sisters, my mom and I stopped in at Bella Bella, the studio of artist Lara Moore. My sister was there to order a custom mirror for one of her bathrooms. She recently purchased a coffee table that is simply gorgeous. Lara gave us a quick tour and we were able to see a new piece in the works. Literally hundreds of layers of tissue paper are glued to a particleboard surface to create the designs. Liquid acrylic is then poured over the piece, layer by layer, until a thick, very smooth protective coating is achieved. It's a process developed by Lara, and she's been very successful with it. If you frequent arty boutiques and shops or art fairs, you may have seen some of her work.
We also went to Textillery Weavers, a local maker of woven throws. In addition to perusing the goods in their outlet store, we were able to watch weavers at work on both hand- and machine-operated looms. The 30+ year old business is owned and run by a wife/husband team. She designs the throws and is the creative force in the venture, while he runs the business end of things. They sell to stores across the country, so you may have seen their goods in shops. I came away with a steal of a deal, this chenille throw, woven on a jacquard loom.
 |
| Photo from Textillery Weavers Web Site |

On our return trip, we spent a night with my parents in Ithaca. Since we were there, how could I resist visiting my favorite independent fabric store, Homespun Boutique? I tried to be selective, and bought only what I would use for handbags, plus one garment for myself.
Beautiful ribbons from Renaissance Ribbon. So colorful! I can't wait to use them in bag linings.

Pleated silk, silk faille, linen and rayon jacquard, and silk stripe for bags.

A gorgeous purple cotton matelasse, which I hope to make into a long vest for myself. Scraps will be great for handbags.

And buttons! These are handmade from Fimo clay, then painted. I love the tiny script on them.

So ended our creative week away from home. Traveling through six northeastern states in early October was a visual delight. The foliage colors were spectacular! I returned with new-found vigor to make handbags, inspired by all of the creative people I met while away, and the beautiful scenery along the way. In my next post, I'll show you what I've been up to for the past two weeks!
Monday, October 15, 2012
September, a Month of Bags
 |
| Photo by Lisa Walker |
Some of you must wonder where I've been for the past month. I've been up to my ears in handbags! After years of considering it, I've decided to design a line of bags to sell. A pipe dream? Perhaps in the long run it will be. But in the short term, it's a success. Let me explain.
This flurry of bag sewing was determined by a potential meeting with a boutique owner in Bloomington, Indiana. My husband and I drove there in late September for a family gathering of sorts. Two of my sisters live there, and my brother drove my parents there from New York, for a week long stay. It's not often my entire family can spend time together, so it was a really special week. It turned out to be an artistic vacation of sorts, which I'll write about in another post.
Back to the boutique. It's called Relish, and the vibe is urban chic. They sell home goods, including furniture, art objects, women's clothing and shoes, jewelry, etc. One of my sisters is a good customer there, and knows the owner, Sharon, well. She contacted her ahead of our visit to see if she would meet with me about my new handbag venture. Sharon agreed, and we met at the store one rainy afternoon. She was a wealth of information as far as retailing my bags is concerned, and we quickly agreed that trunk shows would be a good way to start. I wasn't totally familiar with the nuts and bolts of trunk shows, but basically, the artist shows up with the goods, while the store owner invites her best customers and creates a party atmosphere. It's a low risk situation, where the shop owner can see how well a craft person's work will sell, without making an investment in the merchandise. The shop owner takes a small percentage of the sales, so the profit for the artist is typically far more than selling at wholesale prices.
Sharon liked my bags, suggested ideas for other designs, and offered to hold a trunk show in her store! I wasn't expecting that, so I was thrilled. It was such a positive affirmation of the work I've been doing for the past three months.
My goal for the winter is to design and make at least 50 bags to show in the spring. Sharon gave me some leads for boutiques in the greater Boston area, so I'll be pursuing that as well. Normally I wouldn't travel as far as Indiana, at least, not at the start. But this is a great opening opportunity, given that many of my sister's friends shop at Relish. It could be a fantastic party! Sharon recommended a boutique in Indianapolis, so I'll pursue that in hopes that I can do two shows in one trip.
Relish's vibe is very gray and muted, so I entered our meeting with a bit of a concern because of my love of using bright colors in my bags. Sharon was able to set color aside, and see the potential my bags have. I showed her the two I made in July and August, as well as these three:

This double bag is from Vogue 8590, by Marcy Tilton. I love the versatility this bag offers. It is two bags in one, and others could be switched in and out, creating infinite possibilities. I love the shape, and the hidden pocket beneath the front flap.

I also love the combination of fabrics I found from my stash and at Sawyer Brook.


The unique feature of the bags I'll design is painting. Sometimes the elements will be large, and sometimes small, such as the flourish on this flap. I often add paint to a solid lining, and to inner pockets. I added inner pockets to each of these bags, but they're difficult to see because the top opening of the bag is small.

I love this double bag idea, and plan to stretch it out into a clutch shape, so that I can use one for my wallet items. By adding slots for credit cards and cash, and a zippered pocket for change, it can be a small bag that I carry inside a tote bag. And I can make coordinating second clutches to carry with it when going out. Fun!
 |
| Photo by Lisa Walker |


The next bag is a slight variation on the same design. I refined the side panels a bit, and gave it double handles.
 |
| Photo by Lisa Walker |


While I was making this bag, I kept thinking of my sister's friend, Angela. She loves orange, and has an extensive handbag collection. I showed her the bag and a gathering, and the moment she set eyes on it, she claimed it as hers. I sold it to her on the spot, for a really good price. Another success!
So, why did this take a month? Because I'm not showing you the design that is still in the works, and two others that are near completion. And because of structure. I like a bag that has stiffness to it, so it doesn't stretch and bulge and whatnot when loaded. Craftex is the perfect product for stiffening the bag, but it can't be turned inside out easily. Consequently, sewing the linings into the bags has to be done by hand. Then, there's the edge stitching, which can be difficult to do through stiff fabric and interfacing layers. Much of my time has been spent just figuring out how to put the bags together. I expect that to continue with each design I make, but I hope it will all come more easily the deeper into it I get.
There's no telling where this venture will take me, but as long as I'm having fun doing it, that's ok with me. I'll be posting bags here as I make them, as well as garments I have in mind for myself. It's going to be a busy autumn and winter in the studio!
P.S. Who is Lisa Walker, and why did she take photos of my bags? She's my talented photographer sister. I wanted photos of Angela's bag before leaving it behind, so we did a photo shoot of bags. Her work can be found at Lisa Walker Photography and on SmugMug.
Tuesday, September 4, 2012
Grrlfriend Market Bag
Have you ever made something because you thought you wanted it, only to find out you really didn't need it and might never use it? That's my situation with this knitted market bag.

What enticed me about this beauty was the fantasy of walking a farmer's market and filling my hand knit bag to the brim. The yarn was what sold me on it. I just love the colors. It's Linsey from Berroco yarns. Wonderful to work with, in a blend of linen and cotton. The self-striping effect is so cool!

I say going to the farmer's market is a fantasy, because I have yet to find the likes of the HUGE one in my hometown (Ithaca, NY) here in central Massachusetts. A roofed pavilion, stalls too numerous to count, live music, purveyors of fresh cooked snacks and lunches, art, wine, baked goods, preserves, hand spun yarn - all enhance the task of shopping for the freshest of vegetables and fruit. I miss it.
This summer my husband and I bought a farm share, or CSA. Every Thursday I drive 8 miles to a home where I pick up produce that was delivered earlier in the day. We bought a small share, and it's proven to be more than the two of us can eat. Last week's share contained 2 ears of corn, 4 bell peppers, 4 or 5 hot peppers, lettuce, arugula, a cucumber, cilantro, an eggplant, two summer squash, a pint of tiny yellow pear-shaped tomatoes, and a large tomato. On paper this sounds wonderful, but there was just as much in our box the previous week, and the week before, and the week before... I have banana peppers coming out of my ears. I have a refrigerator bursting with produce, and I'll be picking up more on Thursday.
Ok, I admit, I'm not much for cooking. People say I'm a good cook, but it doesn't happen often. I think it's because I put so much of my creative juices into sewing and knitting. I have little energy left when I enter my small kitchen. Which is another issue. Last night my husband helped me make a grilled vegetable lasagna, and we kept bumping into each other. It was frustrating to have so little counter space, and I had an "aha moment". I finally realized the space issue is part of the reason I don't cook much. The other is that my husband often works late, and I don't like to cook for just myself. A bowl of cereal and fruit is just fine some evenings. Or a salad with every vegetable in my fridge at the time.
The farm share has helped us eat better, and I've made some delicious recipes, but I'm going to be relieved when it ends in a couple of weeks. We're not signing up for the fall session because there will be kale, kale, and more kale. In June, I had kale coming out of my ears. And we don't care for kale, collards, or escarole. We tried it; it doesn't make our taste buds happy. So this fall I'll be going to the local farm stand and buying what appeals to me at the time. And maybe I'll use my bag - although I don't want to get it wet or dirty, or - why did I make this bag?

Look how cool the bottom is! The cast on stitches are pulled through a circle of yarn (Emily Ocker's Beginning, which can be found online). It's a really cool way to start a project. The bag was designed by Laura Spradlin and the pattern is available on Ravelry. It was lots of fun to make. The only change I made was to make two shorter straps instead of one shoulder strap.
Time will tell what I carry in this bag, but I have to admit, it does look great full of vegetables!

In the studio, I'm busy making handbags. I, who vowed to never make another bag for as long as I live, have three handbags in the works. It's been fun shopping my stash and designing one-of-a-kind bags. I let the fabrics dictate the style, shape and mood of each one. That's much easier than trying to figure out how to make a fabric do something it doesn't want to do. I've been doing the painting all at once, since there is some set up and tear down involved in that process. Then I move forward cutting and sewing each one until I arrive at a place where I need another supply, or I'm not sure how I want a certain element to look, and I start working on a different one. I'm usually a one-project-at-a-time kind of gal, but I'm enjoying working this way right now.
I find I really enjoy drafting the patterns, too. There is something very pleasurable about a pencil in my hand. The simple act of physically transferring thought onto paper is something I so seldom do in this digital age. Each time I pick up a pencil, I realize how much I've missed writing and drawing. I've purchased a small sketch pad, pencils, a sharpener and an eraser to keep in my car, so that I can draw ideas as they come to mind. Not while I'm driving, but in between appointments, errands, work and home, etc. Of course, I'll need to design a bag to keep them in!
I plan to have at least one bag completed by the end of the week, so I'll be posting again soon. Tell me, how does your cooking mojo compare to your sewing or knitting mojo? Does it drain your creative energy, or can you do both with no trouble? I'm curious!
Tuesday, August 21, 2012
The Bag to End All Bagmaking (So I Vowed)
Some time ago I promised to write about a handbag I made in July. I'm finally ready to do it. I'm not sure what it is about my procrastination in blogging. I do my best writing with a really clear head, which I don't always have. So I put it off. Going forward, I'm going to try to blog during the process of making things, so things are fresher and quicker in getting onto the page. But I'm usually sewing full-tilt when I'm making something, so my head won't be clear... I don't know what the answer is. Any recommendations or thoughts from you readers are welcome!
Anyway, here it is, The Bag to End All Bag Making:

I started out with the desire to make a sturdy canvas bag to schelp all of my stuff to work - normal handbag items plus lunch and a water bottle. The natural colored canvas I painted with a wash didn't thrill me, but the pieces of linen I had painted with silk screen images did. So I switched to black duck, and was going to make "windows" in it and stitch the linen pieces in behind. Ever try to make a clean, flat window in duck? Not a chance. That's when Marcy Tilton's Vogue 8173 popped out of my pattern cabinet.

(Yes, I own a retro Butterick cabinet, gifted from an acquaintance who purchased it from a store that went out of business decades ago. It holds my pattern stash and much, much more.) But I digress.
The pattern is out of print, and I purchased it years ago because it incorporated silk screening. In fact, it's one of the patterns that nudged me into learning to paint fabric. I had never made it, and I had all of these images painted onto colorful fabric, and I had some gray silk dupioni and gray silk organza, and steam a seam lite, and batting, and Craf-Tex, and hardware, so I dove into the project. And it consumed me. For days. Weeks. For, maybe, 60 to 80 hours. Waaaaay too much time. But it was only time, and I was having fun, so it was all good.
Why did it take so much time? Cutting was partly to blame. I was very careful to cut the dupioni on grain, so I didn't double layer it. The various interfacings were stiff and bulky, so I cut them in one layer. All together, from the outside to the lining, there are 9 layers.
Also, I cut out all of the images painted on the linen. Scissors worked best, but it took a lot of time. Sewing took a long time, too, but I'm getting ahead of myself.
The exterior of the bag is constructed in several layers. The first step is to paint the Steam a Seam Lite. In this photo, you'll notice dark coral rectangles toward the top of the bag. (Click on the photo for a larger image.)


I love how the many layers give so much depth. You can see the texture in the dupioni, the painting on the Steam a Seam, the linen pieces, the organza, and finally the stitching. The light batting gives the linen fragments some dimension.

I didn't have enough aqua/turquoise linen for the lining, so I used a stretch cotton satin from Sawyer Brook. I applied a non-stretch fusible interfacing to keep it from stretching, which worked very well.
Marcy included a zippered pocket in the pattern. I made it slightly deeper, and changed the technique a bit. She used the top zipper tape as the top edge of the pocket. I chose to cut a strip of fabric for the top instead. I love the contrast of the zipper with the gray dupioni.

I wanted more pockets, so I created a double pocket that is tucked to make pouch shapes. I couldn't resist using a painted linen remnant for the lining.

I love trimming interior pockets with ribbon. It adds a little detail that makes me smile when I see it.

These pockets are perfect for my glasses case and phone. I added a magnetic snap at the center above the pockets, to hold the bag closed.

I thought the shirred handles shown in the pattern photo looked dated, so I made stiff ones. I cut them a few inches shorter, as I don't carry bags on my shoulders. The handles are made with the technique I described in my previous post. I love how rigid the Craf-Tex makes them. They don't crumble in my hand!
Before assembling the outer bag, I cut pieces of heavy Craf-Tex the size of the sides of the bag. The corner edges of the bag are edgestitched, which holds the Craf-Tex in place. Craf-Tex is a very stiff product that gives the bag the rigidness and stability I like. I didn't use it on the ends, because I wanted them to fold in.

Applying the binding was the point at which this became The Bag to End All Bag Making. I vowed to never make another handbag again, ever. I recall begging the Universe to save me from myself. Sewing through all of the layers and getting the binding even were very demanding tasks, and tried my patience. it was quite crazy making!
In hindsight, I should have used the lite Craf-Tex, as the heavy was very difficult to stitch through, especially with 8 other layers involved. It was a real struggle for my machine, and I had to hand stitch the ring tabs in place on the inside, as my Pfaff just couldn't handle it.
Surprise, surprise - the Universe did not save me from myself. (Does it ever?) Two weeks later, I made another bag. With Craf-Tex only in the handles. And lots of paint, lots of color, and lots of play. It was a blast. So was this one, actually. I really enjoyed the process, enjoyed seeing what the bag became as I worked on it. And now I enjoy carrying it. It's not a canvas tote, but my handbag necessities fit inside, and I can even squeeze a sandwich into it!
Anyway, here it is, The Bag to End All Bag Making:

I started out with the desire to make a sturdy canvas bag to schelp all of my stuff to work - normal handbag items plus lunch and a water bottle. The natural colored canvas I painted with a wash didn't thrill me, but the pieces of linen I had painted with silk screen images did. So I switched to black duck, and was going to make "windows" in it and stitch the linen pieces in behind. Ever try to make a clean, flat window in duck? Not a chance. That's when Marcy Tilton's Vogue 8173 popped out of my pattern cabinet.

(Yes, I own a retro Butterick cabinet, gifted from an acquaintance who purchased it from a store that went out of business decades ago. It holds my pattern stash and much, much more.) But I digress.
The pattern is out of print, and I purchased it years ago because it incorporated silk screening. In fact, it's one of the patterns that nudged me into learning to paint fabric. I had never made it, and I had all of these images painted onto colorful fabric, and I had some gray silk dupioni and gray silk organza, and steam a seam lite, and batting, and Craf-Tex, and hardware, so I dove into the project. And it consumed me. For days. Weeks. For, maybe, 60 to 80 hours. Waaaaay too much time. But it was only time, and I was having fun, so it was all good.
Why did it take so much time? Cutting was partly to blame. I was very careful to cut the dupioni on grain, so I didn't double layer it. The various interfacings were stiff and bulky, so I cut them in one layer. All together, from the outside to the lining, there are 9 layers.
 |
| Interfacings, Steam a Seam, batting, and stiff paperboard to stabilize the bottom. |
 |
| Materials for the exterior, and templates for cutting the images into shapes. |

These, along with dark gray squares across the center and dark teal rectangles along the bottom, were painted on the Steam a Seam. After they dried, I fused them to the two outer pieces of the bag. Peeling away the paper, I had a nice, tacky surface to lay the linen pieces and ribbon on. Then I fused the silk organza on top. The Steam a Seam melted into the dupioni, but also held the organza in place.
Quilting was the next step, and it took a long time. Probably 4 to 5 hours for each side. I used two colorways of variegated thread, outlining each piece and tying the ends on the back side of the fabric. This added a big Wow factor, bringing the linen pieces into focus behind the organza.

I love how the many layers give so much depth. You can see the texture in the dupioni, the painting on the Steam a Seam, the linen pieces, the organza, and finally the stitching. The light batting gives the linen fragments some dimension.

I didn't have enough aqua/turquoise linen for the lining, so I used a stretch cotton satin from Sawyer Brook. I applied a non-stretch fusible interfacing to keep it from stretching, which worked very well.
Marcy included a zippered pocket in the pattern. I made it slightly deeper, and changed the technique a bit. She used the top zipper tape as the top edge of the pocket. I chose to cut a strip of fabric for the top instead. I love the contrast of the zipper with the gray dupioni.

I wanted more pockets, so I created a double pocket that is tucked to make pouch shapes. I couldn't resist using a painted linen remnant for the lining.

I love trimming interior pockets with ribbon. It adds a little detail that makes me smile when I see it.

These pockets are perfect for my glasses case and phone. I added a magnetic snap at the center above the pockets, to hold the bag closed.

I thought the shirred handles shown in the pattern photo looked dated, so I made stiff ones. I cut them a few inches shorter, as I don't carry bags on my shoulders. The handles are made with the technique I described in my previous post. I love how rigid the Craf-Tex makes them. They don't crumble in my hand!
Before assembling the outer bag, I cut pieces of heavy Craf-Tex the size of the sides of the bag. The corner edges of the bag are edgestitched, which holds the Craf-Tex in place. Craf-Tex is a very stiff product that gives the bag the rigidness and stability I like. I didn't use it on the ends, because I wanted them to fold in.

Applying the binding was the point at which this became The Bag to End All Bag Making. I vowed to never make another handbag again, ever. I recall begging the Universe to save me from myself. Sewing through all of the layers and getting the binding even were very demanding tasks, and tried my patience. it was quite crazy making!
In hindsight, I should have used the lite Craf-Tex, as the heavy was very difficult to stitch through, especially with 8 other layers involved. It was a real struggle for my machine, and I had to hand stitch the ring tabs in place on the inside, as my Pfaff just couldn't handle it.
Surprise, surprise - the Universe did not save me from myself. (Does it ever?) Two weeks later, I made another bag. With Craf-Tex only in the handles. And lots of paint, lots of color, and lots of play. It was a blast. So was this one, actually. I really enjoyed the process, enjoyed seeing what the bag became as I worked on it. And now I enjoy carrying it. It's not a canvas tote, but my handbag necessities fit inside, and I can even squeeze a sandwich into it!
Wednesday, August 15, 2012
French Holiday Bag
I promised to write about the bag I made in July, but first I want to tell you about the bag I made in the past week. As soon as I finished The Bag To End All Bagmaking, sneak peeked in my previous post, I learned about a handbag contest on Pattern Review. The bag had to be made between August 1 and 15. At first I didn't think I had the reserves to make another bag right away, but with the encouragement of others and two weeks of trying to figure out what to make, I started on this:

I've had Marcy Tilton's Vogue 8590 in my pattern stash for several years. It was actually the impetus that led me to collecting silk screens and learning how to use them. I've been gathering silk dupioni pieces as I see them when fabric shopping. When I realized this gorgeous rayon batik from Sawyer Brook coordinated nicely with several of the silks, I chose it as a lining fabric and dove into the project.

First up was to cut my fabric pieces down to size to prepare for painting them. I prefer to paint before cutting pattern pieces out, as it's easier to handle larger pieces of fabric. My bag is made from 8 fabrics (the pattern calls for 9, including lining). Marcy made the cutting process much easier by grouping pattern pieces according to which fabric they're to be cut from. Here is a sample panel:

The pieces are drafted on the same grain line, so you can simply lay the panel over the fabric and cut the pieces out. This is what I did, with the exception of two fabrics that were small and required the pieces to be placed closer together in different arrangements. To make placing the painted images easier, I drew an outline of each piece on the dupioni using a disappearing chalk. Here is one of the painted panels, before the pieces were cut out:

When selecting which silk screen images to use, I considered the lining fabric. It spoke to me of fields of sunflowers and blazing bonfires at sunset. The sunflowers led me to Provence, and the French Holiday Bag was given its name. I used images culled from French culture - a fleur-de-lis, the Eiffel Tower, a letter written in French, a labyrinth from Chartres - as well as natural elements such as a singing bird, a nautilus shell, honeycomb, a bee, and a hydrangea.

Painting these pieces was lots of fun. It was challenging to keep in my head which colors of fabric would be adjacent to one another in the finished bag, so I could choose paint colors accordingly. I used 7 colors of Lumiere that echo the colors in the fabrics.

Construction of the bag went smoothly, with one exception. The interfacing was a Goldilocks affair. The first was too stiff, the second was too limp, but the third was just right.
I started by fusing Acro, a very stiff tailoring interfacing, to all of the outer pieces. After sewing the sides of the bag together, I realized there was no way it was going to gather well when the elastic was inserted into the front and back. it was just. too. darn. stiff. Out came the seam ripper and the seams, and I peeled off all of the interfacing.
My next choice was Armo Weft, a weft-insertion interfacing that gives soft stability. After fusing it, I knew this would gather nicely, so I moved forward and sewed the outer shell of the bag. And it had very little body.
Sooooo, I added a layer of Form-Flex, a woven fusible that had just the right amount of oomph.

The left side with Form-Flex. Nice and stiff, as opposed to the opposite side! It fused nicely over the sides of the bag, even though the seams had been sewn. After fusing, I stitched the Form-Flex to the seam allowances, to keep it in place. Not the proper method of applying interfacing, but no way was I ripping the seams out again.

It stands up! Much better.
The bag has four pockets - one on each outside end, a zippered one inside, and an open double pocket inside. I used the zippered one as drafted, but cut the other one longer, and made two small tucks at the bottom edge.
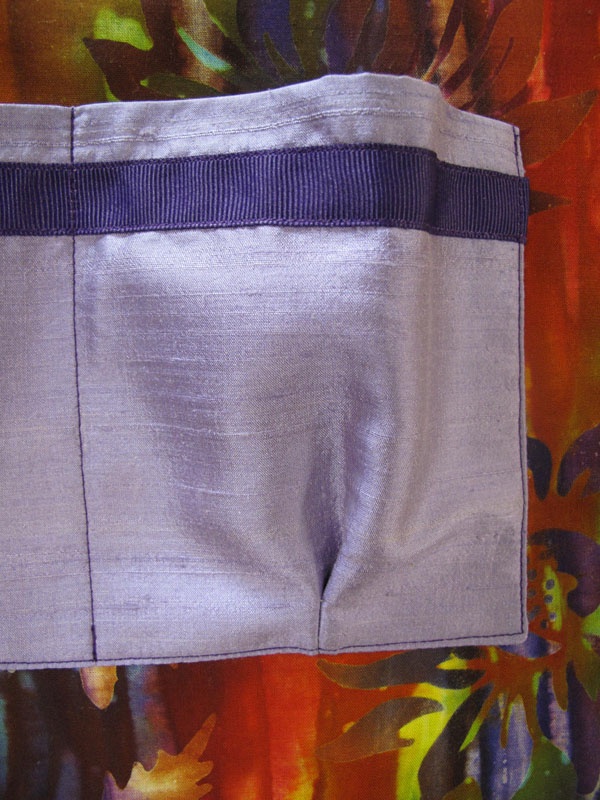
This forms a pouch, which makes it easier to slip in a glasses case or cell phone. I like to add small details to my bags, so I stitched on some grosgrain ribbon.

The grosgrain is also on the inside of the outer pockets, where it will never be seen (but it will make me smile when I remember it!)

The zippered pocket uses a welt method for inserting the zipper. It makes a nice, clean finish. I love all this color!

I wanted stiff, uncrushable handles, so I made some changes there. For each handle I cut two pieces of fabric and a 1" strip of Craf-Tex Lite, a stiff interfacing product Marcy stocks. It's fusible, so I simply wrapped one piece of fabric around it and fused.

I pressed the edges of the other strip of fabric an eighth of an inch narrower, sprayed it with adhesive, and finger pressed it to the other strip. I then edge stitched the handle with the narrower fabric facing up.

This process encases all of the raw edges without having to turn a tube of fabric, and the Craf-Tex makes it very durable.
To stabilize the bottom, Marcy recommends plastic canvas or cardboard. I prefer a really stiff bottom in my bags, and years ago I purchased a large piece of paperboard. It works great for this purpose. I add a layer of needlepunch so there's no "CLUNK" when I drop things into my bag.

I added feet to the bottom of the bag, which is why you see a hole drilled in the paperboard.

I ran into some difficulty when trying to pull the elastic through the casings on the front and back. My bodkin slipped off the elastic several times. I finally got it through. Instead of stitching in the ditch with the machine, I did it by hand. There's a ditch on the facing side, too, so the stitching needed to hide in both ditches.

Marcy used narrow ties to close the bag, which gave a nice finishing touch. I knew I wouldn't want to have to tie it shut, so I inserted a small magnetic snap in the center front and back facings.
The snap makes the bag a bit plainer, but with all of the images, color, and that fabulous lining, I think it looks just great! It won't be an everyday bag, but I can hardly wait to carry it to a museum, out to dinner, or on a shopping trip. Who knows? Maybe some day I'll get to carry it in Provence!

Subscribe to:
Posts (Atom)