It didn't take long for me to see it wasn't going to stand as straight as I had hoped!
When loaded, it prefers to slump. But I still like it and have carried it daily for nearly two months now.I had been looking for fun fabric combinations in my stash and at Sawyer Brook Fabrics (where I work), when this gorgeous striped shirting arrived. My penchant for purple and love of stripes had me sold on it right away. It was a done deal when I saw how well it coordinated with another shirting cotton from Sawyer Brook, which became the lining.
I had been playing with an out of print Vogue pattern, 7463. I like the shape because the sides taper a bit. The original style is rather plain:
I decided to miter the stripes, which really pumps up the appeal. It was painstaking, but well worth the effort.
Wanting a really sturdy bottom that didn't sag (unlike my own!), I inserted a piece of non-corrugated cardboard I had purchased a few years ago at an art store. It's more of a paperboard, I believe. It's gray, and the layers can be peeled apart with effort. Anyway, my DH cut it to the size I needed, and drilled holes so I could put feet on the bag:
To make the fabrics more durable, I fused a medium-weight interfacing to all of the body and lining pieces. For stiffness, I lined the shell of the bag with heavy Craf-Tex interfacing. This gave the bag enough support to stand upright on its own.
There is one zippered pocket in the pattern. I added 5 more.
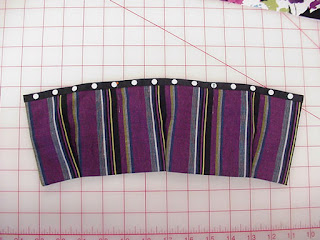
I wanted some gusseted pockets for my glasses, cell phone, and date book. I fashioned this from one strip of fabric, and made small tucks to form the gussets. The polka dot ribbon trim adds some stiffness to the edge, and a touch of whimsy.
Knowing that weight on the sides of the bag would cause it to slump, I stitched the pockets low in the bag. In hindsight, I wish I had sewn them even lower, so the contents would rest on the bottom of the bag and reduce strain on the side.
I wanted a flat pocket to carry papers (bank deposit, mail, etc.), so I added that to the other side of the lining. A smaller pocket is attached to it - a handy place for my car keys. I also attached a key fob on a long strap to the top edge of the bag. I keep my work and studio keys on it, and it has become my secondmost favorite feature of the bag. With the long strap, I can pull it out and unlock a door without having to remove the keyring from the clip. Very handy!
My favorite feature of the tote is the water bottle bag I constructed. It is interlined with two layers of needlepunch fleece for insulation, and lined with PUL - a knit fabric with a water resistant coating (popular for diaper covers, I believe).
I sewed this into the side seam of the lining, so it keeps the bottle standing upright and easily accessible. This feature has been wonderful. No more water bottle sweat on the other contents in my bag, and it helps keep the water cold. I'll definitely include this feature in the next tote I make!
Before inserting the lining, I crafted ring tabs from my linen trim, using a template (cut from a manilla folder) to press the edes in so they would be even:
I like the additional interest the tabs make on the exterior of the bag. I placed the rings so both fabrics could be seen through them. This design element turned out to be a flaw. In spite of all of the reinforcing I had done with the interfacing, the tops of the tabs became stress points when I held the bag by the handles, creating a horizontal fold between the two tabs. Basically, the top of the bag turned inward, and the line created by the stress became a ridge. Sooooo, I topstitched the straps to the top edge of the bag. This took care of the stress issue, although it doesn't look as nice. If I use this pattern again, the rings will need to be attached at the top edge of the bag.
The webbing I used for straps is from M & J Trimming in New York. I couldn't find any locally that was the correct width to fit the rings. The webbing is very sturdy, and doesn't crumple in my hand. Very good quality; I highly recommend it. Several people have asked why I didn't make the handles longer, so the bag could be carried on my shoulder. After having surgery on both shoulders years ago, I don't carry anything on them. I cut the straps long enough for carrying the bag comfortably on my arm or in my hand, which works for me.
Here's a peek inside my completed tote. It's almost a shame to have this pretty lining covered by all of the stuff I put in here, but it makes me smile when I catch a glimpse of it.
This was a very time-consuming project because of all of the features I added, but it was well worth the effort. I love carrying it. And when it becomes too worn for everyday use, it will make a great knitting bag!


Very smart and thoughtfully constructed bag!
ReplyDeleteWhat a nice piece of workmanship and pretty too.
ReplyDeleteHi Dixie,
ReplyDeleteI just found your blog through the Sawyer Brook website where people post their projects. This bag is lovely and functional. The water bottle holder sewn in the seam is brilliant.
-Anna