Thursday, April 17, 2014

A Triple Duty Tote


My husband and I are going on a company trip to Hawaii in a couple of weeks and I wanted a new tote to take on the trip. Something that would do as a carry-on, shopper, and beach bag. Needing a durable fabric that could handle sitting in sand, I headed to our nearby home dec fabric store. I looked for about an hour and finally decided on a cheery, whimsical floral print. The base was like poplin, so I knew it would hold up to the uses I intended. 

I cut out the bag that evening and was all set to start sewing it the next evening, when I realized what a blunder I had made. This print would be fine in Hawaii, but no way would it play well in the Boston or San Francisco airports. The perfect beach bag, yes. But not, ahem, a sophisticated urban tote.


Sooo, back to the home dec store I went, this time deciding on a quiet gray/taupe linen/rayon herringbone fabrication. I knew I wanted to paint it, and I wanted to make the handles from some dark purple faux suede from my collection. Purple would look great with this fabric, so I didn't think it would be a fail.

I chose the Eucalyptus stencil from Diane Ericson, and went to town painting both sides of the bag. I intended to add some dragonflies the next day. But when I walked into the studio to resume working on it, I saw I had made yet another error. This bag looked so drab, there'd be no way I'd carry it in Hawaii. Maybe in Boston in the winter, but definitely not in April.


Back to the proverbial drawing board. What did I really want? A fabric I could paint. A dark fabric that wouldn't show dirt. A sophisticated look with a touch of individuality. 

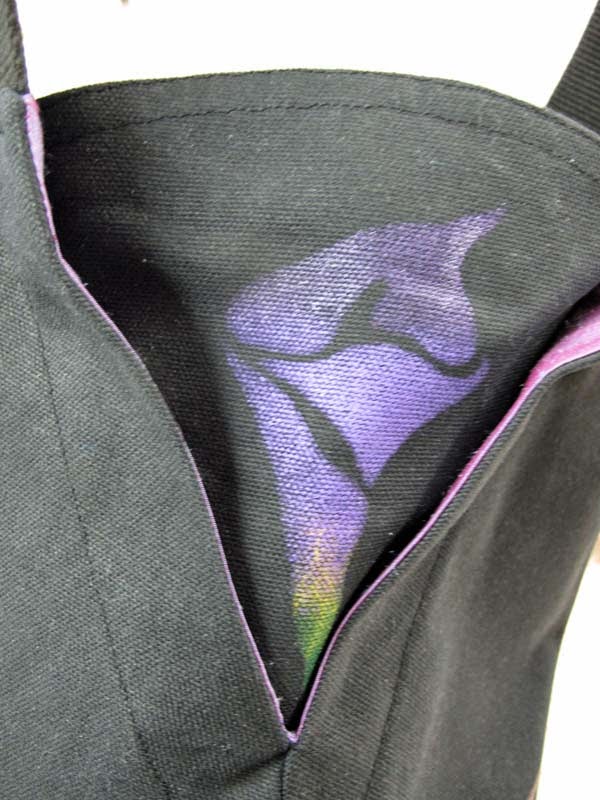
Feeling a bit like Goldilocks, off I went to JoAnn's, where I got a yard of black cotton duck at a 40% discount. I took it back to the studio and tried out two new silk screens I got last week from June Colburn. While I love the screens - Lotus Flower and Dragon - neither looked good. They were just not the right size for the large bag. In a last-ditch effort I pulled out my new Calla Lily stencil from Diane Ericson, printed a practice lily, and I knew I'd finally found the right combination.


 I love my new bag! It's colorful without being cutesy, it's just the right size, and it's appropriate for all of my travel needs.

The pattern is the L2 Bag from the Sewing Workshop. I loved making this bag! The pattern is well drafted and written, so it was easy to follow.

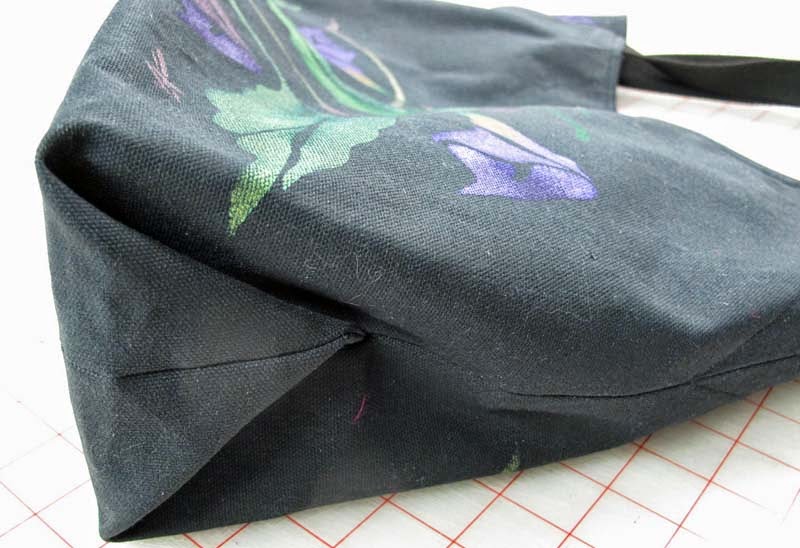
There were a couple of tough areas to sew, partly because my fabric was very stiff.


The first trouble I ran into was with the side gussets, which are sewn in after the main part of the bag is lined. That made for three layers of duck and three layers of silk dupionni to sew through. I had to do the best I could with pin basting, as there's no way I could have got a needle through the heavy fabric.

The second trouble spot was sewing the plastic needlepoint canvas into the bottom of the bag (used as a stiffener). It's done by stab-stitching through the center bottom seam, but you have to do it with one hand inside the bag, with no visibility of the plastic canvas. It took a lot of feeling what I was doing, rather than seeing it. Patience and focus paid off, and the task wasn't so bad after all.

I learned a new trick with this pattern: the side pleat on the outside of the bag. I won't try to describe how it's done, as pictures show it much better. But it was easy and I like the finished look.


Yes, I lined the bag with silk dupionni. Extravagant, I know. But I had it on hand, and the color matches the purple paint perfectly. I neglected to take photos before inserting the lining in the bag. Suffice it to say I put in a zippered pocket, and my usual double pleated pocket to hold my phone and glasses case. There was a flat double pocket in the pattern, but I didn't make it because I knew I wouldn't use it.

Lesson learned? Time away from a project can do a world of good. Excited with the idea of a new bag, I had stuck my head in the sand as I forged ahead on the first two bags, not really "seeing" what I was making. In each case, I put in hours of work, only to not like the look of it the next day. After I slowed down for the third one, everything fell into place.

Trial and error is most certainly the way the design process works. But learning to look and see along the way is crucial to being satisfied with the finished product. I'm not saying this bag is perfect or exactly as I would like, but it is good enough for my needs and I'll get a lot of use from it!

Sunday, April 13, 2014

Whimsical Red Vest

I'm back! After about four months of little or no sewing, my desire to create in the studio is stronger than ever. Which feels sooooooo good! I've been playing in the studio nearly every day for over two weeks now, and I'm learning and creating and having a blast. I've been playing with stencils and paint, making some sample prints and some finished garments. Here is the first item I've made this spring:


As they say here in New England, that's wicked bright! It's a gorgeous linen from Marcy Tilton that's been in my collection for a couple of years now. The trim fabrics are remnants from Sawyer Brook. I used Diane Ericson's Revisions Java Jacket pattern. It was very easy to add a couple of inches at the sides and bottom to make it fit, and it's a very straightforward pattern to follow. The fussy part was the binding on the neck and armholes, but it wasn't difficult. Just painstaking to make sure things lined up just so.

The theme for the vest was determined by the buttons, which are fused glass, made by a wonderful woman who lives in Rhode Island. I see her every year at the regional sewing expo, and she had a trunk show at a local yarn shop this past winter. I've amassed quite an assortment of these buttons over the years, so it was a joy to finally use these red ones.

I love the geometry in these buttons, and how the melting process softens the edges a bit. They're still very angular, but there's a feminine quality to them as well.


No two buttons are alike, so they offer nice variety as design elements. 


I painted the black band and the bodice using stencils from Diane Ericson. The buttons determined the colors and influenced my choice of stencil images. I love the whimsical touch the stenciling adds to the garment!


The pattern offers two lower pocket options, but I decided not to use them, as I didn't want to draw attention to that part of the garment. I really wanted the focus to be at the top, with a strong vertical center element. Those are the lines that seem to flatter my body most.

I neglected to take a photo of the back. It is two overlapped pieces, with a long vent at the bottom. At the waist there's a blue shaped tab adorned with a button.

I'll have a few opportunities to wear this before the weather becomes too warm for it. Then it's into the closet for a few months. It's a great spring/autumn piece, and it will add lots of color to my look when I want it!


Next up: a tote bag I finished today, to take to Hawaii at the end of the month. Stay tuned, as I'll be writing again soon. Promise!